Edit: Since sharing this post and asking for advice, I have learned that you don't actually need a blueprint to achieve this effect. Within the animation curves, you need to enable a small checkbox next to the curve. Then if you have a scalar parameter with the same name existing in the material as the anim curve, it will auto update.
If making dynamic wrinkle maps again, I would only create 2 additional normal maps, 1 squash and 1 stretch and use masks to set the normal map to the blendshape.
Hey! I thought I'd try out this blog thing by writing up my process for making dynamic wrinkle maps in Unreal Engine 4 for my latest project, Rhys which you can check out by clicking here
I want to start by saying that until 2 weeks ago I had never used UE4. I have a limited knowledge of coding but had no idea how Blueprints worked in UE4 either.
I had recently finished playing the second season of TellTale's Batman series and noticed, specifically on Harley Quinn's character model, that they're using wrinkle maps that blend in and out based on character expression and I wanted to try and replicate that. I was working on a small fan art of Rhys from Tales from the Borderlands as I had not long finished playing that and thought that this project would be a really good testing ground.
It's particularly noticeable in her brows and her smile:

So I decided to venture into Unreal Engine for the first time... It took me a while to get used to the interface and menus but it's fairly intuitive and I was doing fine after a few days. Then I started looking for tutorials on how to create dynamic wrinkle/normal maps and I hit a wall. I didn't know how Blueprints worked for one thing, for another, a lot of these tutorials had snippets of images or sections of the blueprint but rarely the whole thing together. I spent some time learning how to set up my materials properly and then how to use Blueprints, just combing through the UE4 intro tutorials. Eventually I felt confident enough to start building my own blueprint for Rhys.
The basic logic for my dynamic wrinkle maps is this:
In the Material:
Each wrinkle map is connected to each other using linear interpolation (lerp) nodes. The final lerp node in this chain is fed into a BlendAngleCorrectedNormals node along with the Base Normal (A neutral expression). There are a serious of masks that correspond to blendshapes on the character model and parameters associated with each mask. All of these parameters are set to 0. This means that all of my wrinkle maps and my base normal map are blended together but because all of the masks are set to 0, only the base normal will be visible.
In the Blueprint:
I get the material for the skin and create a Dynamic Material Instance of it. This means I can change the parameter values within this material at runtime. I get the animation that is playing (In this case it's just a simple loop of the character changing expressions). There are curves in this animation that are controlled by the blendshapes on the character's face. I get the value of each blendshape curve. I then use this value to set the value of the corresponding mask within the material. This means that the mask becomes as opaque as the value of the curve and thus, the wrinkle map comes through this mask!
The basic starting point is to set up the material. For Rhy's model I had 4 material elements, 1 for skin, 1 for hair, 1 for clothes and 1 for eye shine. The one for skin is the one we care about for these wrinkle maps.

I pulled in my textures from Substance Painter and connected everything together for each material then I came back to the skin material. This is the material that will contain all of the wrinkle maps.
My wrinkle maps had been baked out individually from Marmoset Toolbag 3 and were all set up for UE4. In total I had 6 normal maps:

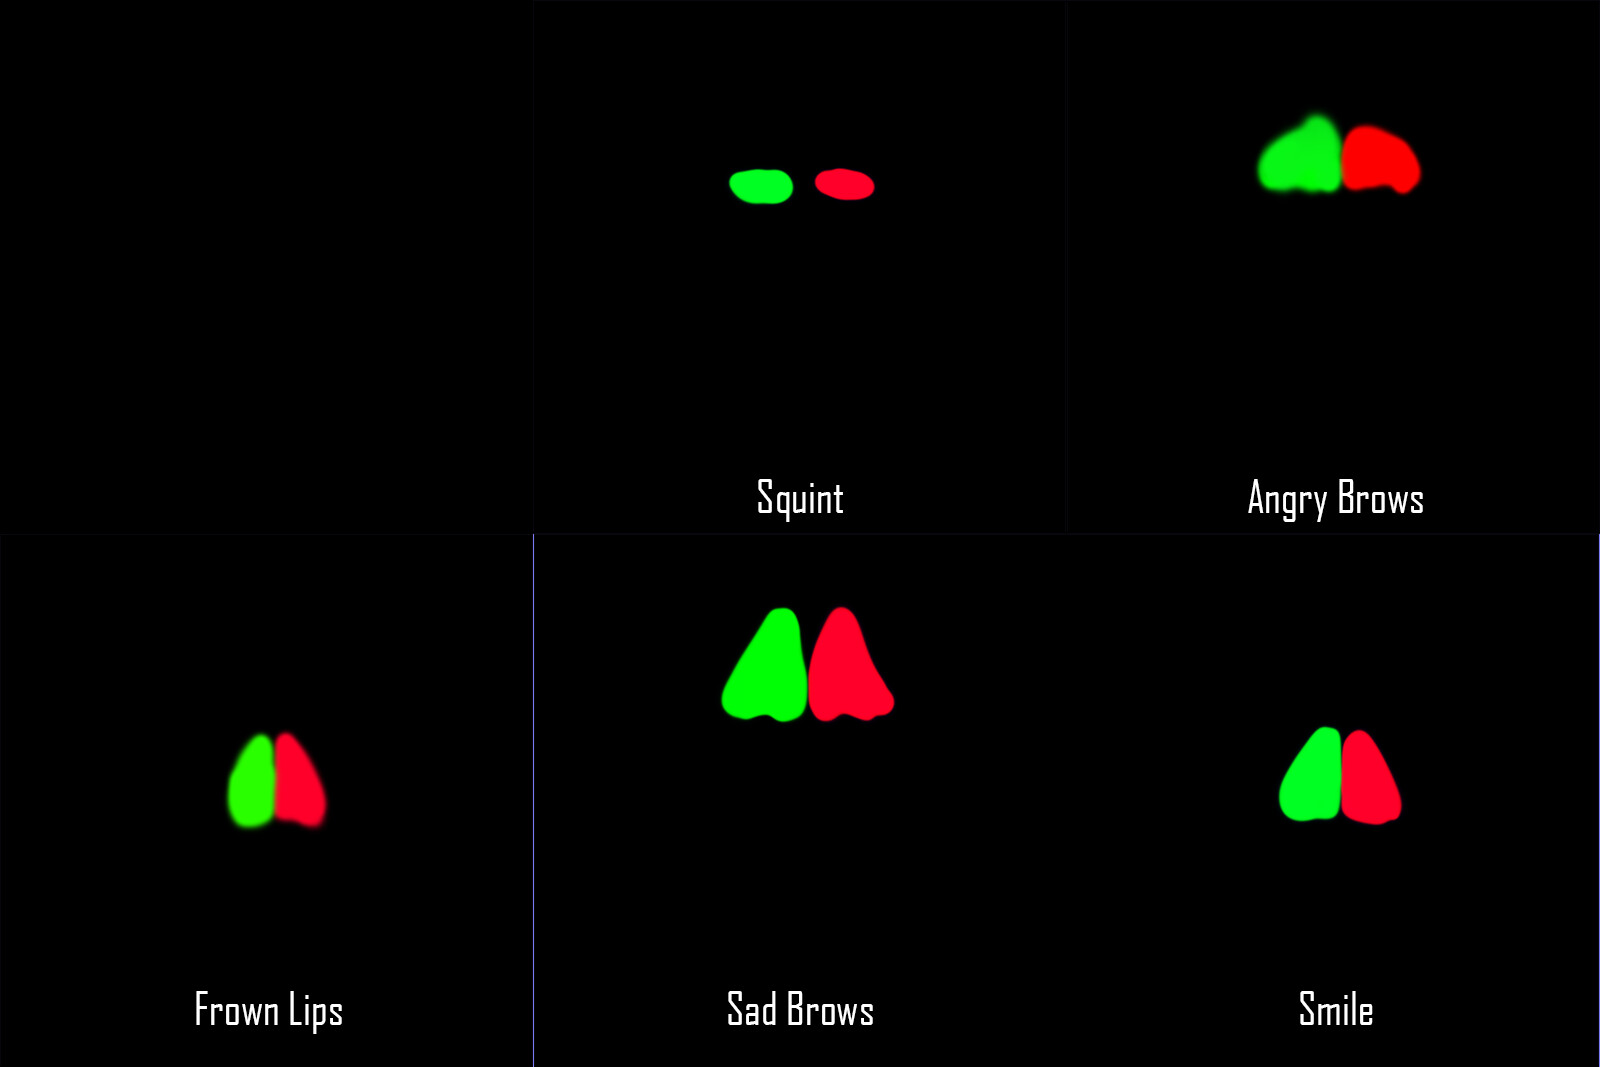
But these normals effected both sides of the face. i.e. The Angry Brows normal map covered the whole brow area but I had blendshapes that would only effect the left or right side. So I had to create a series of masks to mask between left and right. I created 1 mask texture for each wrinkle map painting the left side red and the right side green for the areas I wanted to effect.
Then I set up the wrinkle maps and masks in the skin material in UE4. I started with my base normal initially unconnected. Then I pulled in each of the wrinkle maps and their corresponding masks. The first wrinkle map is connected to a linear interpolation node along with a pure blue Vector 3 node. Then I need to get the alpha from the masks.
But I also want a parameter associated with this mask so that I can control how visible it is. To do this, I right click in the material editor and type in ScalarParameter. Then I name this node correctly. i.e. AngryBrows_R_Param will be the parameter associated with the right side of the AngryBrows wrinkle map. This parameter is set to 0.
So for the alpha I take this new scalar parameter and either the red or green channel from the masks (depending on what side I am working on, right or left. I only drag off the red channel for left and for right, I drag off the green channel.) and connect both of these into a Multiply node. Then I connect the multiply node into the lerp node containing the normal of the wrinkle map.
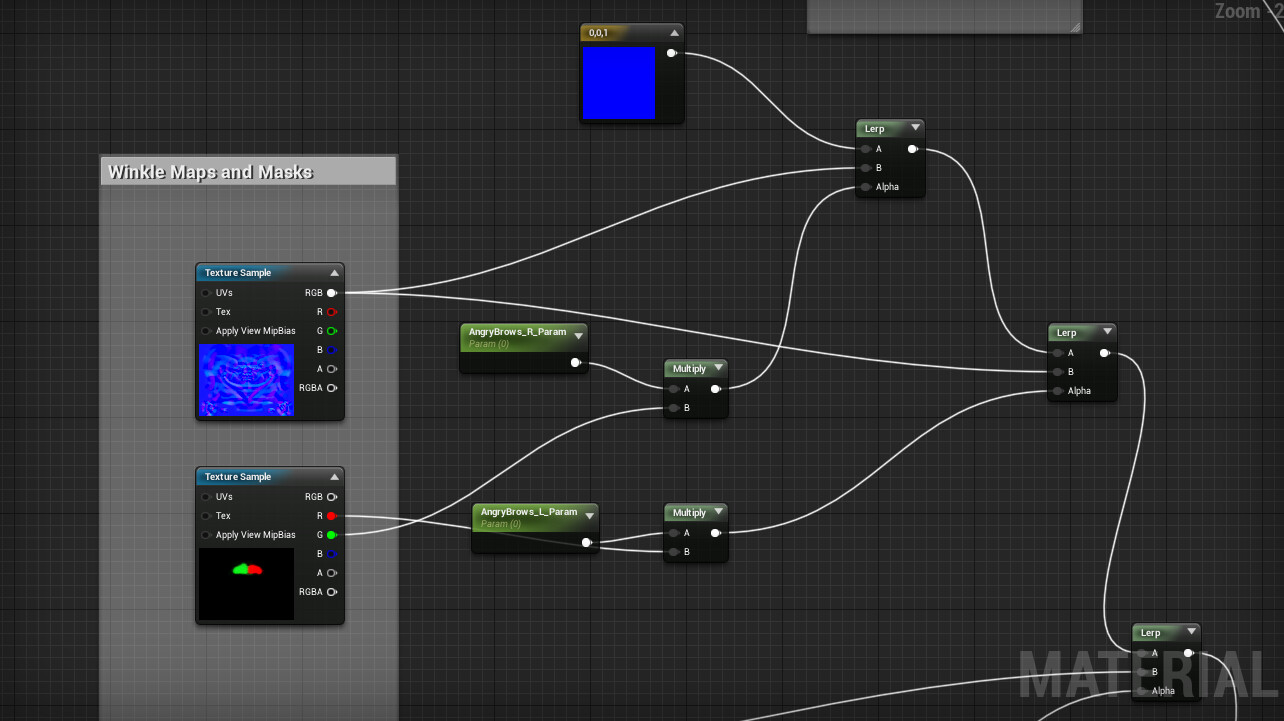
This is how I set up each wrinkle map and mask. I then take each lerp node and chain them all together. Then I take this final lerp node and connect it to a Blend Angle Corrected Normals Node with my base normal in the BaseNormal slot. In the end, my material looks like this. I've tried to patch everything together so you can see it.
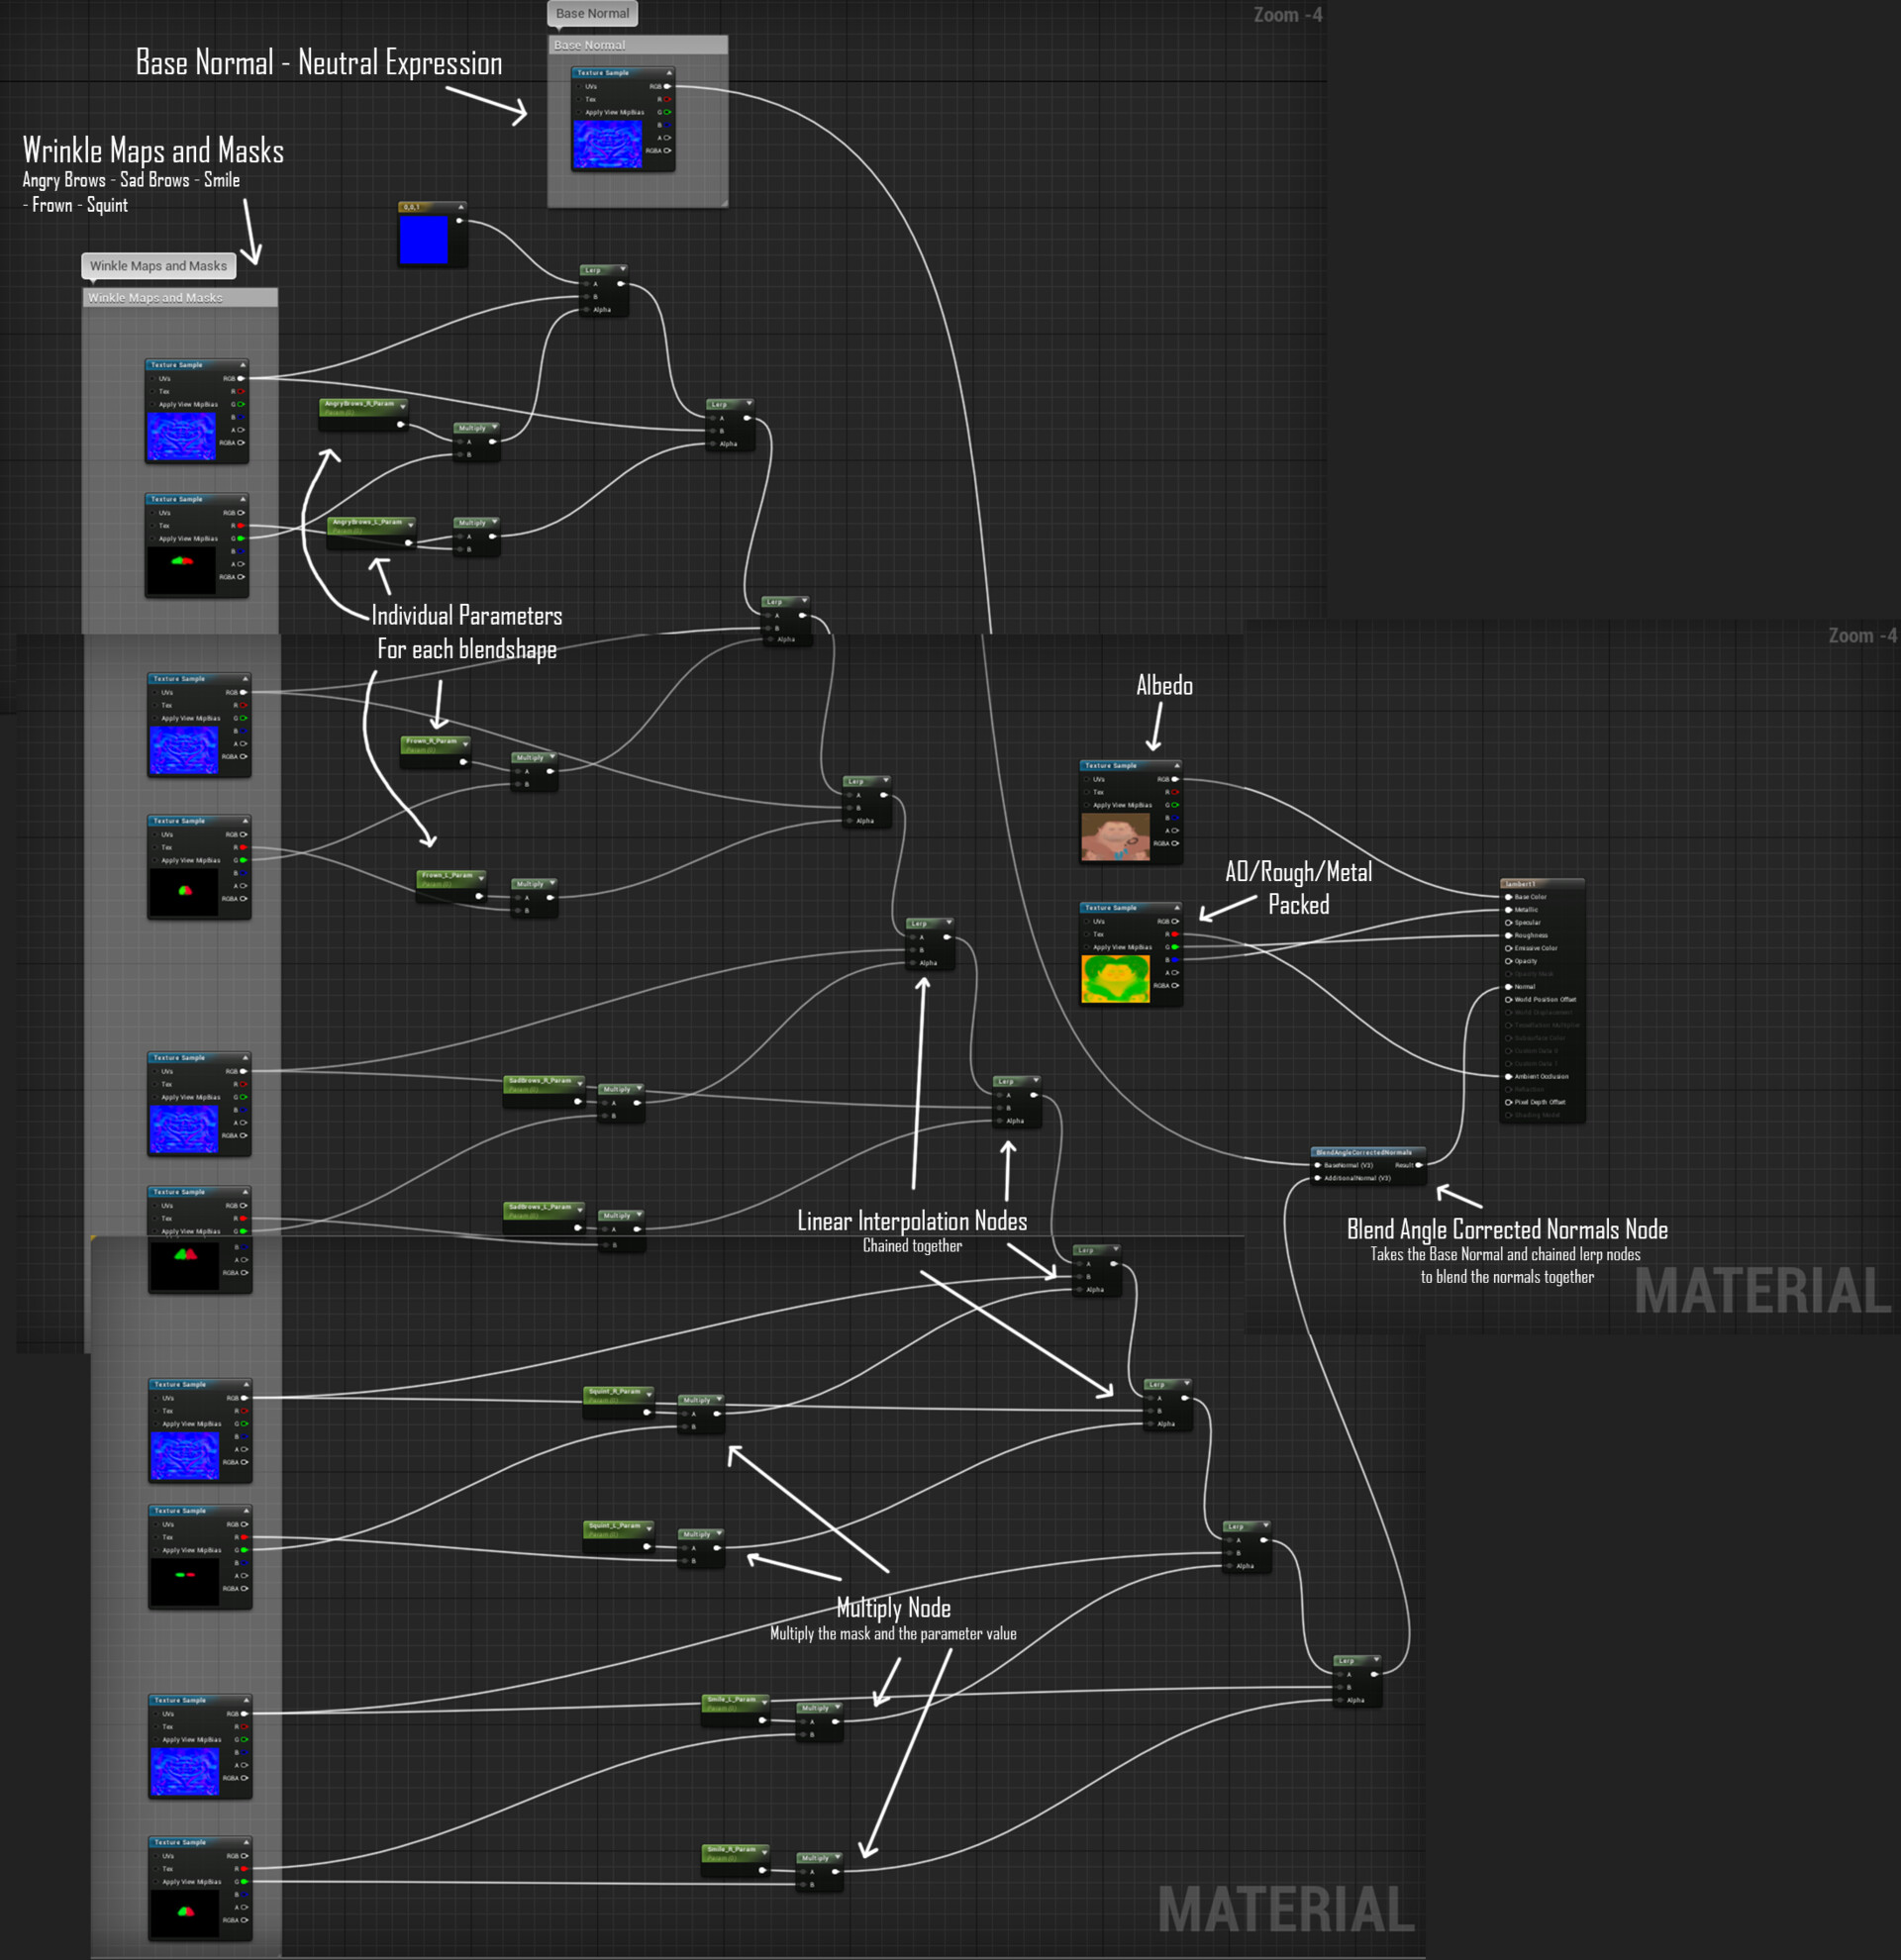
I tried to organise this to make it easy to read, but let me know if it doesn't make sense! I also have my parameters all ready to be accessed in the Blueprint:

OK, so for me the material was the hard part! Now it's time for the blueprint that drives all of this!
I create a new actor blueprint and navigate to the Event Graph tab. Then I need to get a reference to my character. I do this by adding a component of a Skeletal Mesh

Then on the right hand side I can set the skeletal mesh to be my character model.
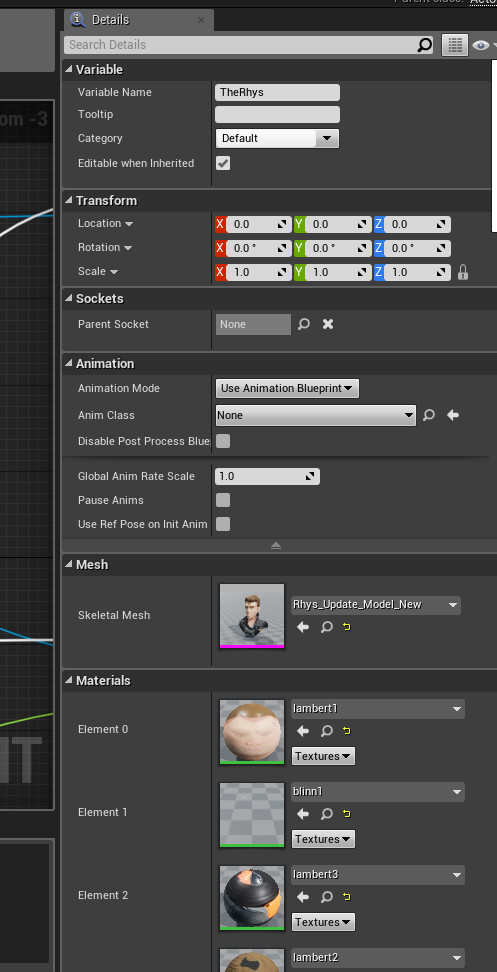
From here I can drag this component into the editor and access it that way,
So with the skeletal mesh in the editor I Create a Dynamic Material Instance and set the source material to the skin material (In this case lambert1). I set the exec of this to happen on Event BeginPlay (When we play the game) and the target to be my skeletal mesh. Also from this Create Dynamic Material Instance I drag off the exec so that I can start playing the animation.
Now I want to access my blendshape curves so that I can get their value for updating my parameters within the skin material. To do this I drag off from the skeletal mesh node and use Get Anim Instance. Then using this node I can get the curve values for every curve in the animation, but obviously, I will only need the curves that drive the blendshapes that effect the wrinkle maps.
Opening up my animation I can see the curves and I need to make sure that I get the correct name of the curve I'm going to access in the Blueprint
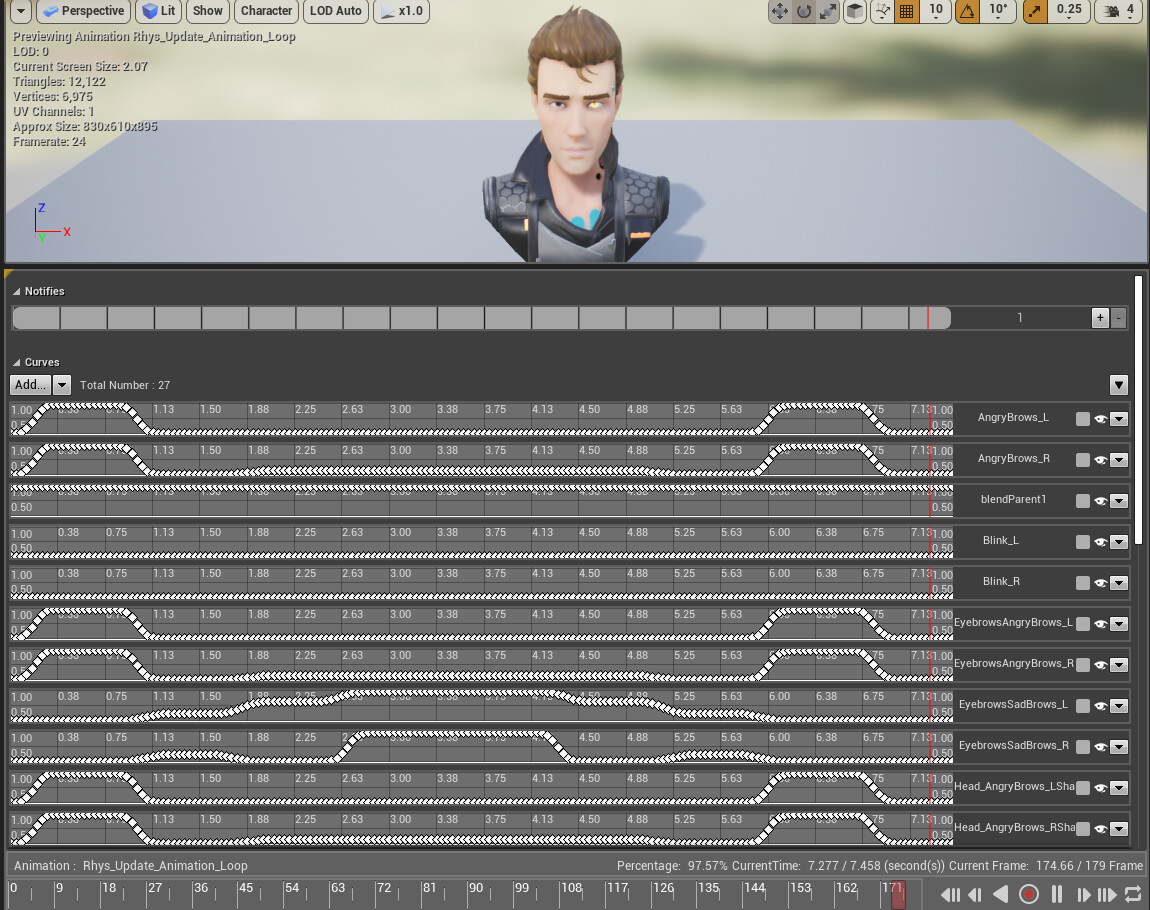
And to get the curve value I just need to type in the correct name of the curve. So to get the AngryBrows on the right hand side value I need this setup:

Now the next bit is to get the wrinkle maps updating. I want this to happen every frame and in UE4 this is called a tick. I use Event Tick to kick everything off. I take the exec from Event Tick and plug it into a Set Scalar Parameter Value Node. Then I take the return value from the Get Curve Value I plug that into the same Set Scalar Parameter Value node where the parameter name matches the parameters from the material that I set up earlier.
Then I follow the same process for every parameter that I set in the material and chain each Set Scalar Parameter Value node together until I get my final blue print looking something like this;
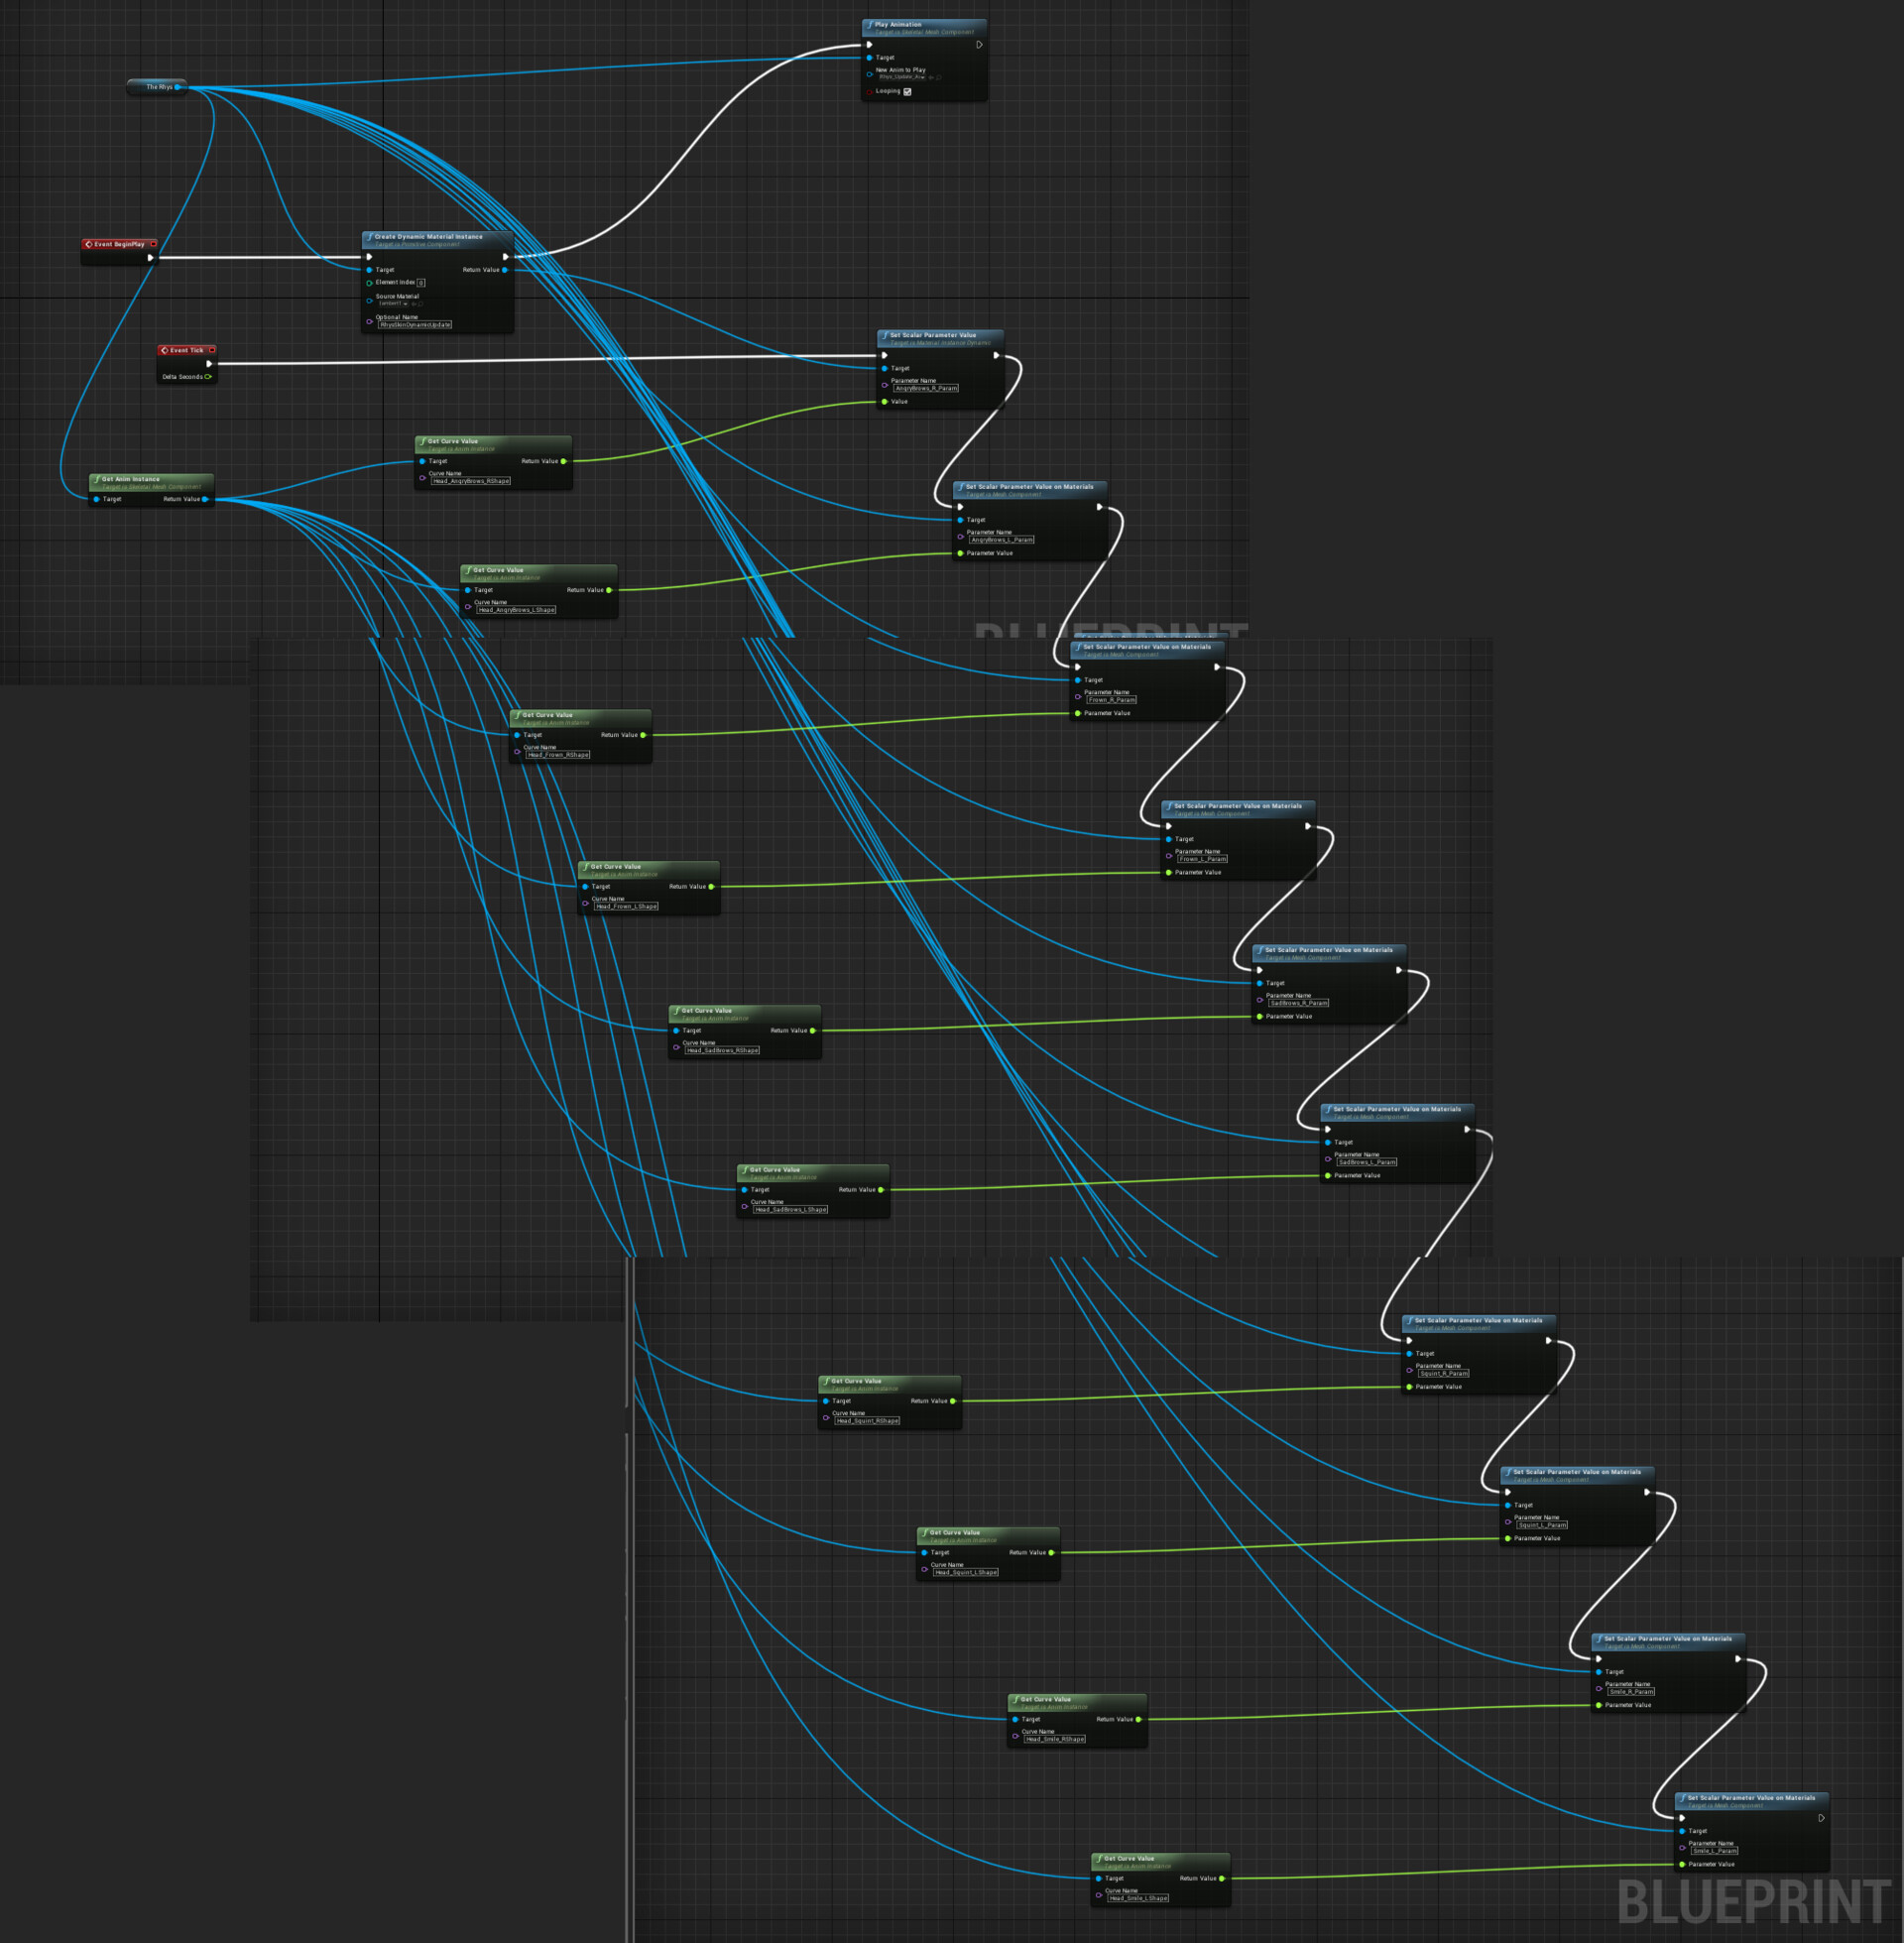
And then I just drag my Blueprint into a scene and hit play!

There are probably ways that this could be further optimised, but I'm still new to UE4 so not sure where to tidy things up just yet. I could definitely have merged my normal maps to try and cut down on the number of textures I was pulling into the engine.
This took a lot of trial and error for me as I am a complete UE4 beginner so I want to link some of the resources I used to eventually build up my working project.
Getting Started with Character Morph Targets Live Training Unreal Engine