Website powered by

XGen to Unreal Engine 5 Breakdown + Simulation Setup

Tutorial / 07 July 2024
Update:
Been meaning to add a little update to this. From Unreal Engine 5.6, Epic introduced the Maya to Metahuman plugin which has a Groom Exporter. This exporter allows you to export directly from XGen Core, tag each descriptions with a group ID, set Root UVs based on what mesh you choose, and choose whether guides are included or not. It will pull the guides from the actual description as the guide curves to use in engine (including CV count). You can also set the up axis which means you don't have to fiddle with transforms on import to engine. This is so much faster than having to do all this manually and has saved me a TON of time in the last year.

I'll leave this full blog here just in case anyone wants to do things manually or has an xgen interactive project they want to export.


In my most recent personal work, I wanted to try and breakdown how to get a created strand hairstyle from XGen Core to Unreal Engine 5. I also wanted to see how easily I could setup physics simulations with these strands and what issues I would run into whilst doing this. 

I know that Epic’s documentation is a little sparse, so I want to thank Andrew Giovannini for his amazing YouTube tutorial on exporting and importing from XGen to UE5 and I want to thank Matthew Aitchison for answering every random question I had no matter the time of day!

Exporting 

This hairstyle was created in XGen Core, so we need to convert to XGen Interactive to be able to use in Unreal.  
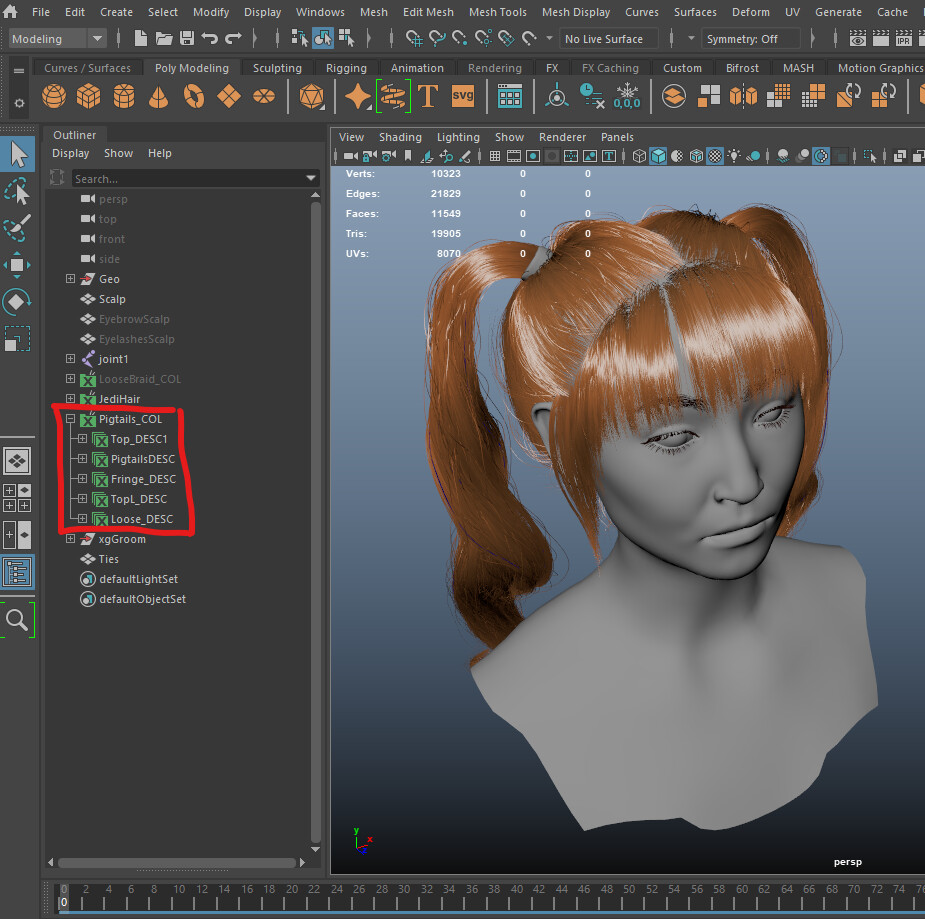
Image of XGen scene 
Image of conversion to xgen interactive 

When converting, you may notice that the hair looks extra frizzy and jagged. This is especially noticeable on really curly/coily hair. To help resolve this, we can rebuild the strands in Interactive:  
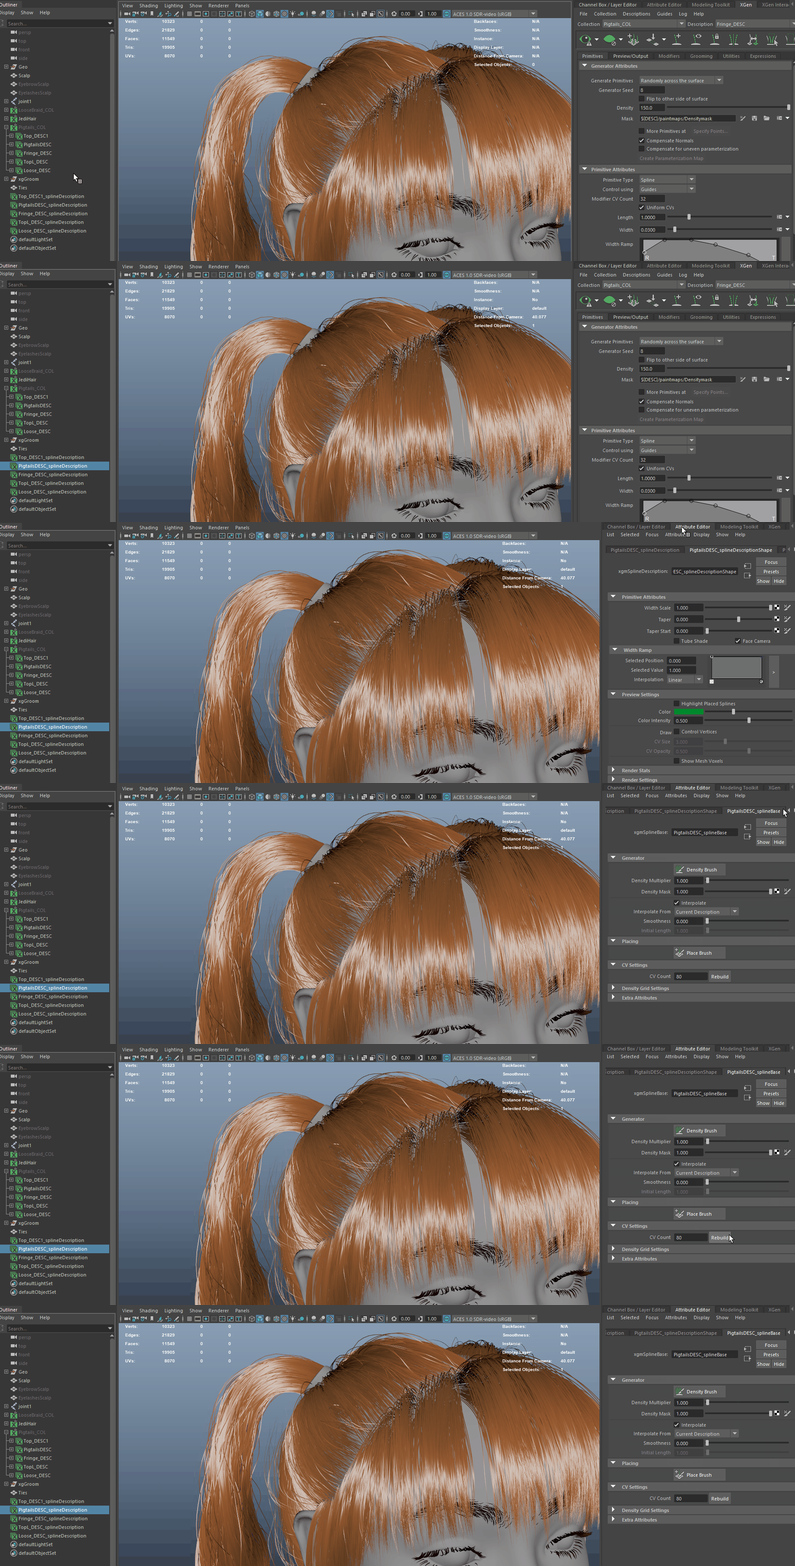
Gif of XGen Interactive rebuild 

We can export these converted descriptions directly as an alembic that Unreal can read, however, these strands won’t have any attributes applied or be broken into different group IDs. 
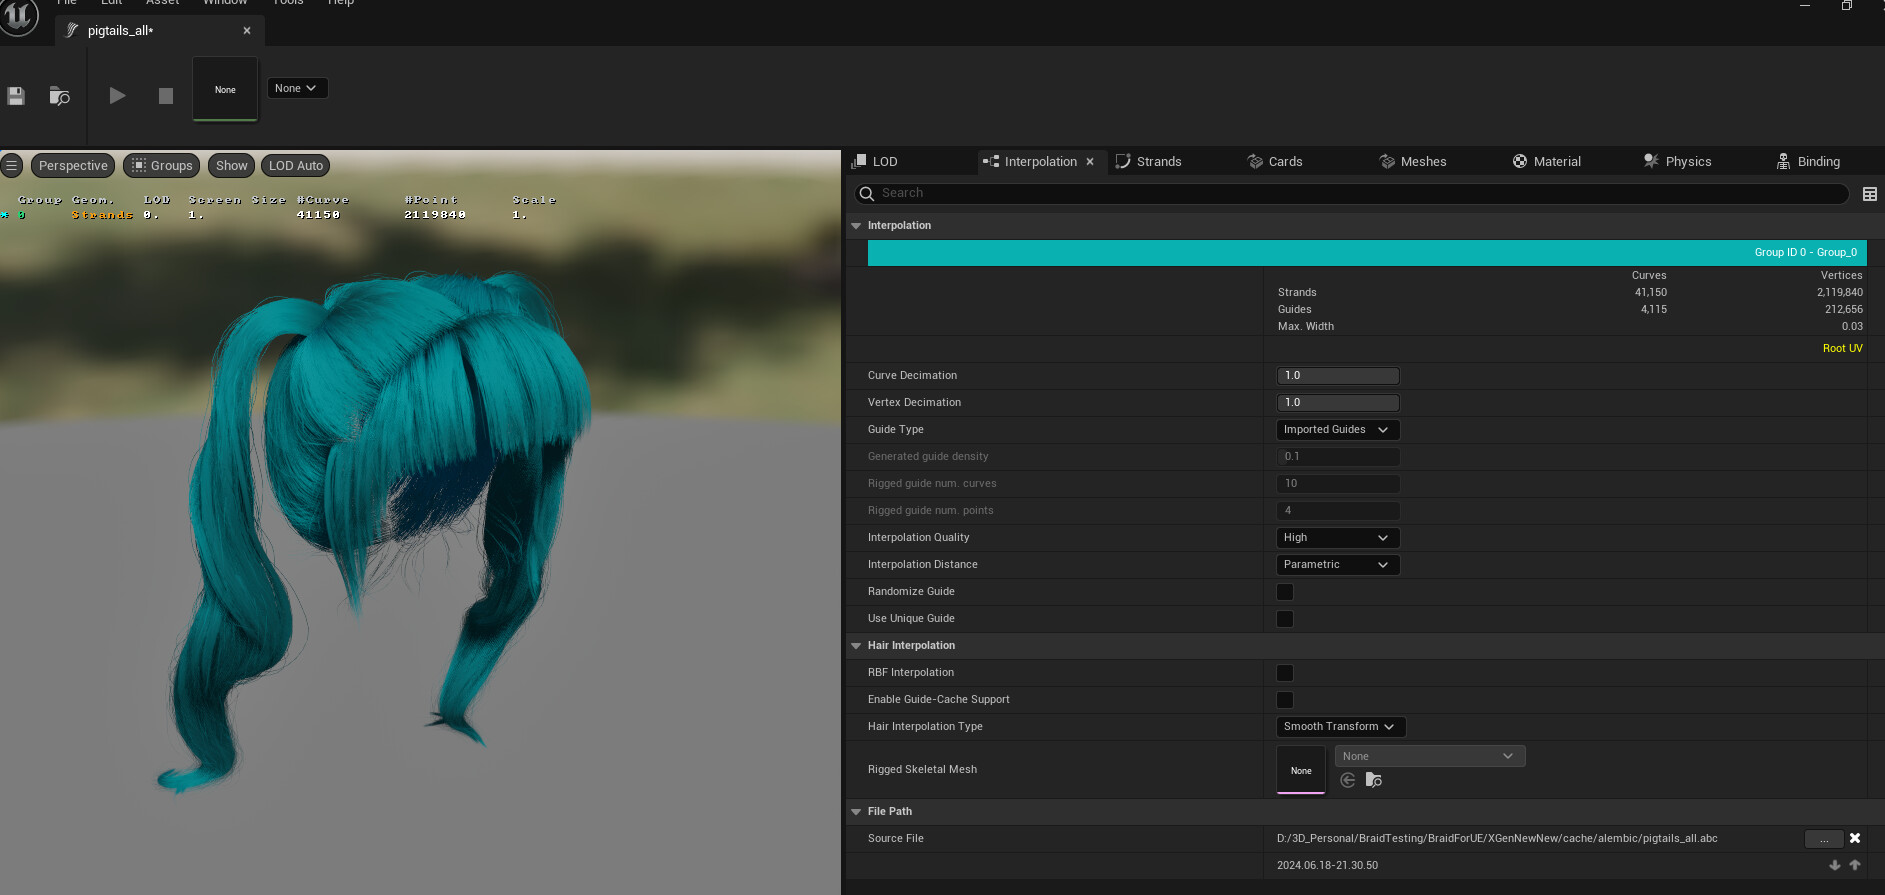
Image of raw groom asset in UE 

This groom is just 1 group with no RootUV attribute and no custom guides. 

We can apply the attributes that Unreal can read from code snippets on Epic’s documentation. 

Note that this code is for Python2 and won’t work on Maya 2022 and up without edits. 

Andrew Giovannini has a great video going through how to apply these attributes to your own grooms.  

To apply the 3 attributes from Epic’s documentation, you will need a “scalp” mesh with UVs, an xgGroom group with your guides and your imported xgen interactive groom. I generally rename these curve groups to something easier to work with. 
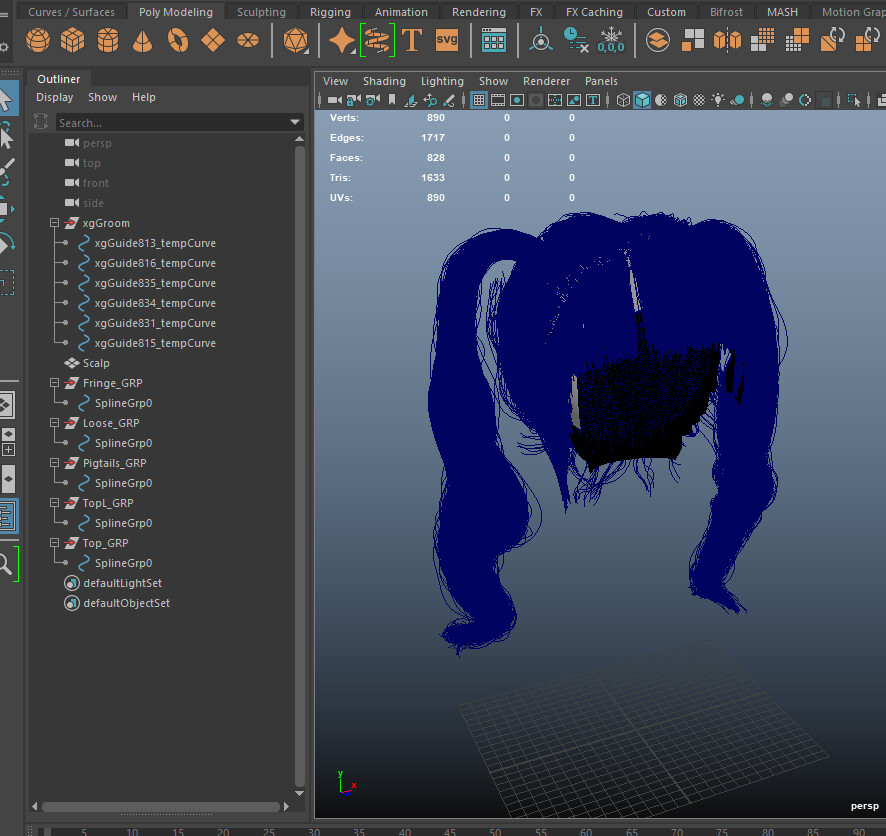
Image of my curves scene before applying the attributes 
Image of scalp mesh with UVs 

The 3 attributes that Unreal needs are groom_guides, groom_root_uv and groom_guide_id – and I apply them in that order.  

The guides are what the engine will simulate and then apply to the surrounding strands based on their range to the nearest guide. I only really need guides for the pigtails as the fringe can be simulated with the generated guides in engine. 

Groom Root UV takes the UVs of your scalp/head mesh (or any mesh for that matter) and projects that onto the roots of the strands. This means that you can use textures that line up with the scalp UVs for things like highlighted sections or colour changes.  

Groom Guide ID allows you to group chunks of your hairstyle into different IDs. These IDs can then have different simulation settings or different materials applied to them.  

Note, I have 3 descriptions that cover the “Top” portion of the hair and I only want them to export as 1 group ID. I had issues exporting these as 1 ID whilst retaining the RootUV attribute. 
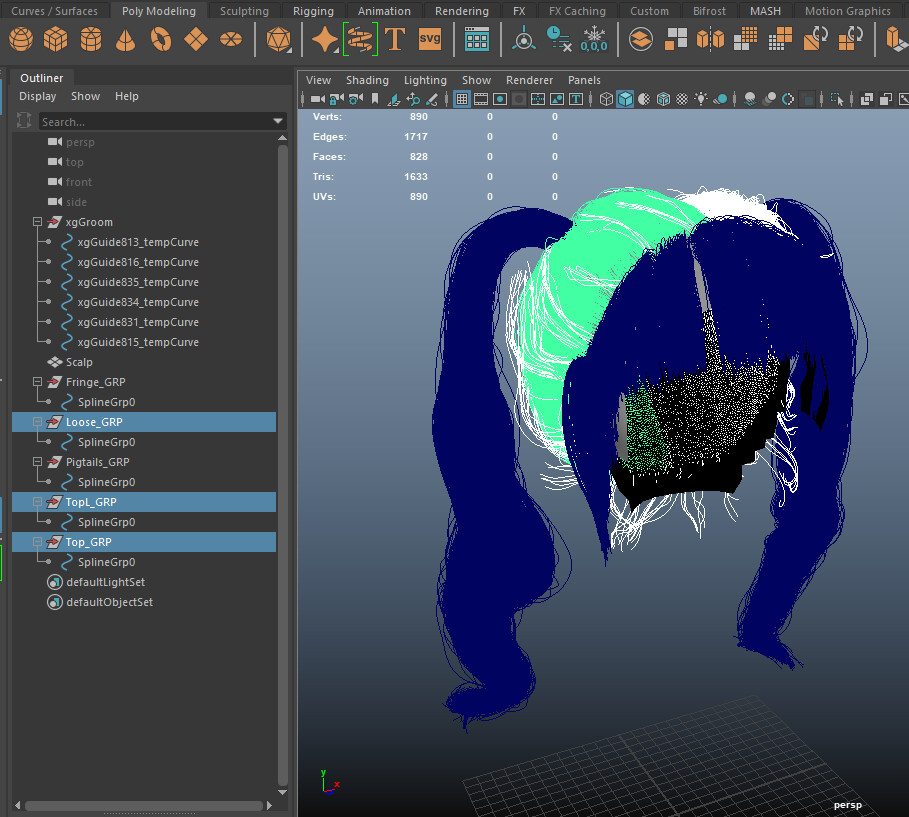
Image of the three top chunks 

My workaround for this (with help from Andrew Giovannini) was to manually apply the groom_group_id attribute to those 3 chunks as defaultvalue = 2 (This means it will be imported as the third group in the groom asset). Then apply the original groom_group_id script to the Pigtails and the Fringe as group_ids (0 and 1).  
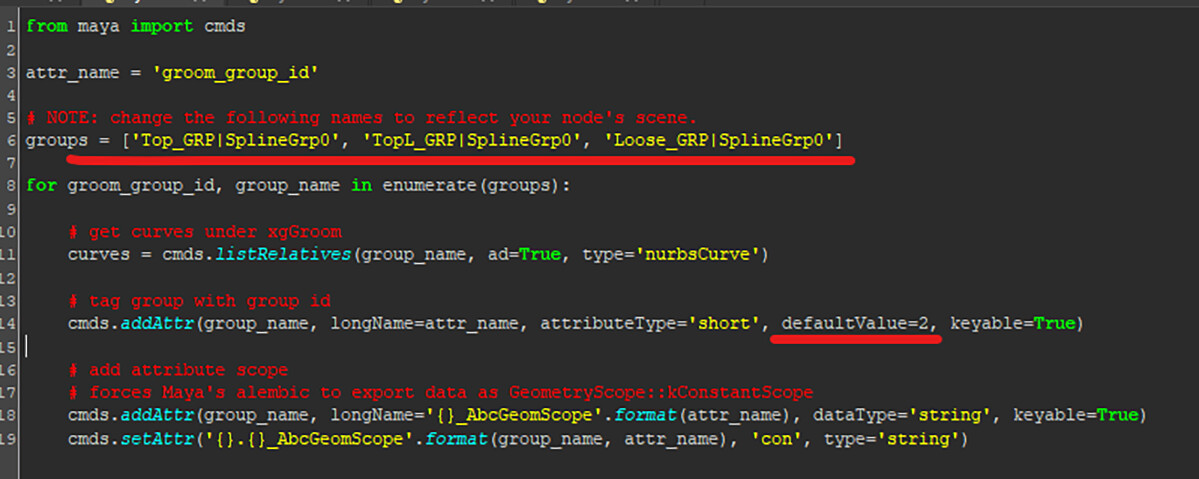
Image of the code changes

Note, I needed to apply the RootUV attribute to these curves BEFORE I applied the group_id attribute. 

Image of curves scene with colour code of how I grouped the curves 

I didn’t re-parent any of the curves, as that caused issues with my RootUV attribute, but just made sure to group_id them correctly.  

Once these attributes have been applied, you can export the curves and the guides as an alembic (.abc). You don’t need to export the scalp. 
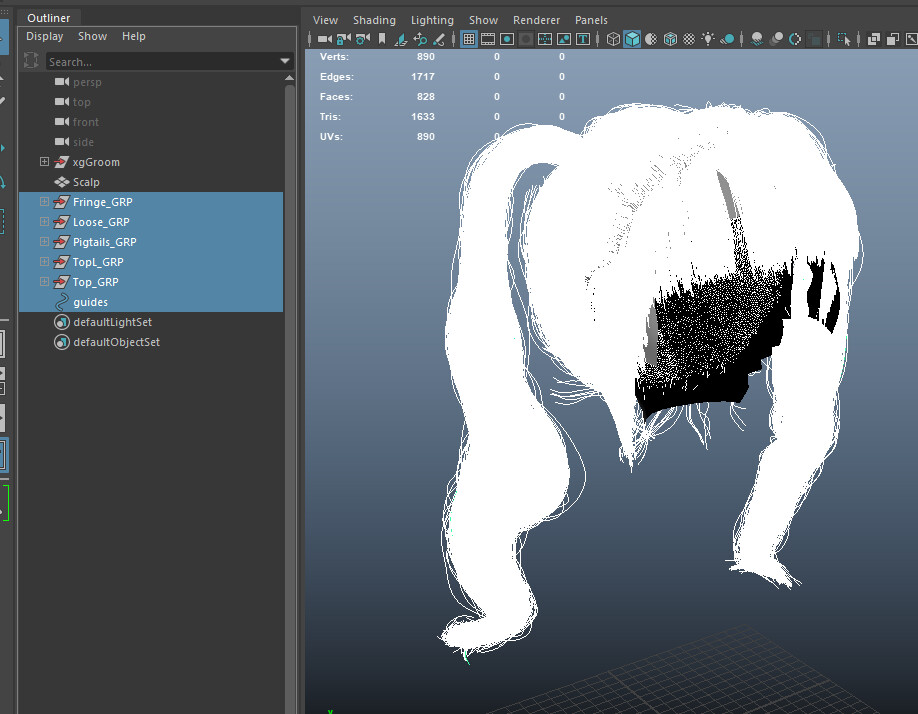
Image of selection that gets exported 

Note, remember to add the attributes to the export settings! 

Image of attributes added 

Importing 

When you import the alembic into Unreal, it should come up with the import options. We want to check that the Status is Valid and that Unreal has been able to read the attributes and they are Valid and include the RootUV. We should also be able to see the groups from the groom_group_id attribute and one of these groups should have imported guides – this should be Group_0 so that we can use the imported guides for simulation. 

Image of import settings 

Note, you’ll have to edit the transform settings to match these: 

Image of transform settings 

We can then open the groom asset to check that the groups are in the right order. Using the groom debug view, we can see the groups organised by colour.  

Image of groups in UE 
Image of groups in UE

And that the guides have correctly imported.  

Note, to check “imported guides” versus “generated ones”, we need to switch on Enable Simulation.  

Gif of checking guides 

Note, by default, the guides will ONLY work on group 0. If you want guides on other groups, you need to tag them as such in the attributes. 

We can also see if the RootUV has worked by viewing it in the debug mode.

Image of rootUV debug

We can see that the rootUV looks smooth across the hair. If it hadn’t been applied properly, there would be areas that had no data (grey) or flat colour data.

Simulation

Simulating strands is just a toggle per each group ID, this means you can switch off simulation for parts of the hair you don’t need to move – like the top portion here.  

Simulation is driven by guides. Strands are simulated based on the nearest guide. Guides are automatically generated based on a percentage of the actual groom but you can set it to use the imported guides (if you created them).

Gif of how guides can be setup showing the decimation of curves and the use of imported guides 

I recommend trying different values and seeing what they do to the strands.  


Using the Groom

If you want to just render a static image, you can just parent the groom under a static mesh and reset the transforms. But, if you want the hair to move with a skeletal mesh, we need to set it up to work with the mesh. 

First, we create a binding asset that will bind your selected groom to a specified skeletal mesh. Right click the groom asset and select Create Binding Asset. Then select the skeletal mesh you want to bind the groom to. 

Image of binding
Image of binding

Then, with the skeletal mesh in your scene, from the details panel we can add a Groom Component.

Image of details panel

With the groom component, all we have to do is plug the groom asset and binding asset into the corresponding slots.

Gif of adding assets

The groom will now follow the skeletal mesh and any animations it uses.

Gif of strands following animations

Methuman Material

Epic have created a hair strand shader that works really well for most grooms and it’s available through the Epic Marketplace. 

Image of metahuman search

Just search for Metahumans and download the Metahumans project that has the 2 metahuman examples. You don’t need the plugin or any additional setup, just the example assets.

Image of the correct project to download

Create a project using this asset pack and open it up. 

Image of project opening

From here, we can access the shaders that are being used. For groom, we need the Parent material for the material instance being used for the hair strands. This material should be called M_hair_v4

Gif of getting the parent material

Then we can just migrate this parent material and its dependencies to our own project. 

Image of migrate

Note, when you migrate, we need to make sure we send the material to the root “Content” folder.

Image of migrate

Using the Material

As far as I understand it, Epic’s Metahuman shader makes use of additional attributes outside of the 3 that they share on their documentation. This means that when importing custom grooms things like the highlight, ombre and texture won’t work. To get around this, I built a custom shader that uses the majority of the Metahuman’s shader whilst adding my own highlight, root, tip and texture values.  

By default, the groom asset has 0 material slots which means that when you apply a material in the editor, it will apply to everything. 

Image of default material

Adding material slots means we can assign materials to different groups of the groom asset. To add a slot, we just click the + icon in the Materials section of the groom asset.

Image of material slots 

This groom asset has 3 groups and I want to have 3 material slots, one for each group. This gives me a lot of control over how the final hair will look. It’s also worth renaming the material slots for future use.

Image of added material slots

Now we can assign these material slots to the different groups of the groom in the Strands tab.

Image of assigning materials

With these materials assigned, we can now create different materials and apply these to the different material slots for lots of customisation. 

Gif of applying materials

Things to Note

  • Guides automatically only apply to Group 0 - to have different guides on different groups, you need to tag the guides with the group number in the attributes.  
  • Epic’s Metahuman hair shader has access to attributes that they haven’t shared on their documentation and so some values won’t work on custom grooms. 
  • As far as I’m aware, you can’t attach objects to the strands (like a hair tie) I’m sure there will be a workaround that someone will share in the near future.

I learnt a lot working on this breakdown but I still have a lot more to learn! And because Epic's documentation feels a little incomplete, I've probably missed things or used weird workarounds to get past them. Also feel free to drop a comment on message me on Twitter if you have a question or I didn't explain something well.


Breaking Down References for 3D Hair Creation

Tutorial / 08 January 2024

When making real time hair cards, we talk a lot about breaking down references. But how do we do this? I thought I'd share a little blog of how I like to use my references. I originally shared this over on Twitter, I'm going to try and post little tips on hair creation more regularly over there.    

First off, where's the best place to find references? Pinterest has some amazing ideas and when you click through, it often takes you to fashion sites with decent resolution images and some of these sites and lots of "How to wear your hair a certain way" type posts that can spark a new idea!

YouTube hair tutorials are also fantastic for finding 360 turn arounds as well as how the underlying style is created! There is a wealth of knowledge there especially for 4a, b and c hair types.

So you've found your main reference, but what hair type is it? Deciding on the hair type can help you find more references and help you have consistent textures when you come to create them. Image from HaveGoodHair.com

Hair type is broken down in to Type 1-4 and a, b, c. The higher the number the more curly/kinky the hair is. The higher the letter, the tighter the curls/coils are resulting in more dense hair. 

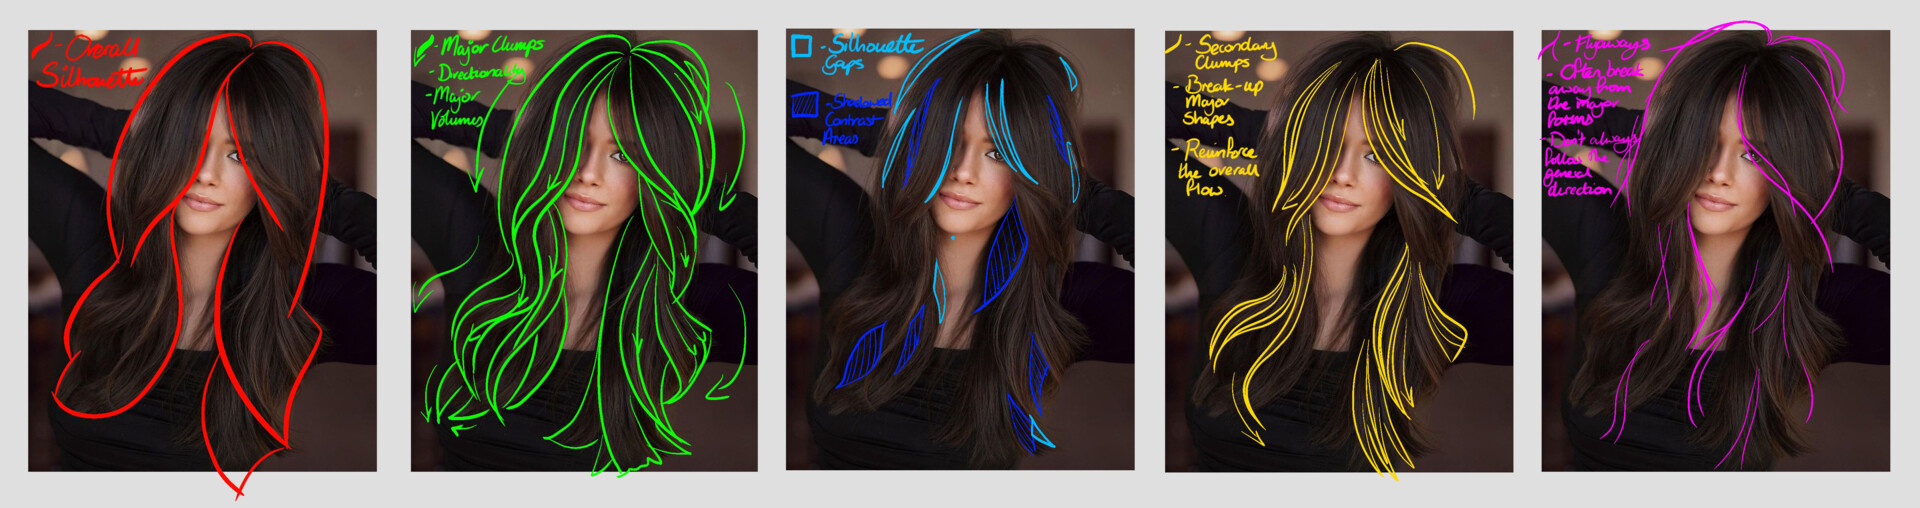
Now it's time to breakdown our reference. I like to work from big shapes to small. Start with the silhouette, then major clumps. Find your negative spaces and where the shadows and contrast are. Then the breakup clumps and finally flyaways. Here are some paintovers I like to make before starting the hair project.

For curly hair, I find it extra important to find the shadowed areas in a reference so that I can show depth when I come to place the cards. Keep coming back to your references as you create your hair and try to maintain the darker areas. 

Afro textured hair can often be harder to read because it can be so dark and thick, you may have to up the contrast to really pick out the thinner clumps.

Here's a look at how I started my reference board for a previous hair style. I was going for a sci-fi cut that wouldn't really exist in real life (unless you were pretty brave with your styling) so I took a bunch of different styles and mashed them together!

Now, how do I apply all of this referencing to a 2D texture plane? Remember, you can always change your textures as you work. Iteration is good! Also, remember to optimise your texture space. Got a big empty section? Throw some flyaways in there! Got a little bit of space down the bottom? Add some short transitional hairs for the hairline!

Some final thoughts: breaking down a reference takes practice like everything else and I always recommend going slowly - god knows I often forget this and mess up! It's good to gather lots of references of similar styles but have a 'master reference' that you are aiming for. And finally, have fun! Making real time hair shouldn't be soul destroying! Find cool references and make it your own!

I've written creation breakdowns for my pink hair and the mohawk hair but there are some fantastic breakdowns and tutorials for hair creation all over the place. Here are some of my favs:

Dynamic Wrinkle Maps in UE4

Making Of / 09 December 2019

Edit: Since sharing this post and asking for advice, I have learned that you don't actually need a blueprint to achieve this effect. Within the animation curves, you need to enable a small checkbox next to the curve. Then if you have a scalar parameter with the same name existing in the material as the anim curve, it will auto update. 

If making dynamic wrinkle maps again, I would only create 2 additional normal maps, 1 squash and 1 stretch and use masks to set the normal map to the blendshape.


Hey! I thought I'd try out this blog thing by writing up my process for making dynamic wrinkle maps in Unreal Engine 4 for my latest project, Rhys which you can check out by clicking here

I want to start by saying that until 2 weeks ago I had never used UE4. I have a limited knowledge of coding but had no idea how Blueprints worked in UE4 either. 

I had recently finished playing the second season of TellTale's Batman series and noticed, specifically on Harley Quinn's character model, that they're using wrinkle maps that blend in and out based on character expression and I wanted to try and replicate that. I was working on a small fan art of Rhys from Tales from the Borderlands as I had not long finished playing that and thought that this project would be a really good testing ground. 

It's particularly noticeable in her brows and her smile:

So I decided to venture into Unreal Engine for the first time... It took me a while to get used to the interface and menus but it's fairly intuitive and I was doing fine after a few days. Then I started looking for tutorials on how to create dynamic wrinkle/normal maps and I hit a wall. I didn't know how Blueprints worked for one thing, for another, a lot of these tutorials had snippets of images or sections of the blueprint but rarely the whole thing together. I spent some time learning how to set up my materials properly and then how to use Blueprints, just combing through the UE4 intro tutorials. Eventually I felt confident enough to start building my own blueprint for Rhys.

The basic logic for my dynamic wrinkle maps is this:

In the Material:

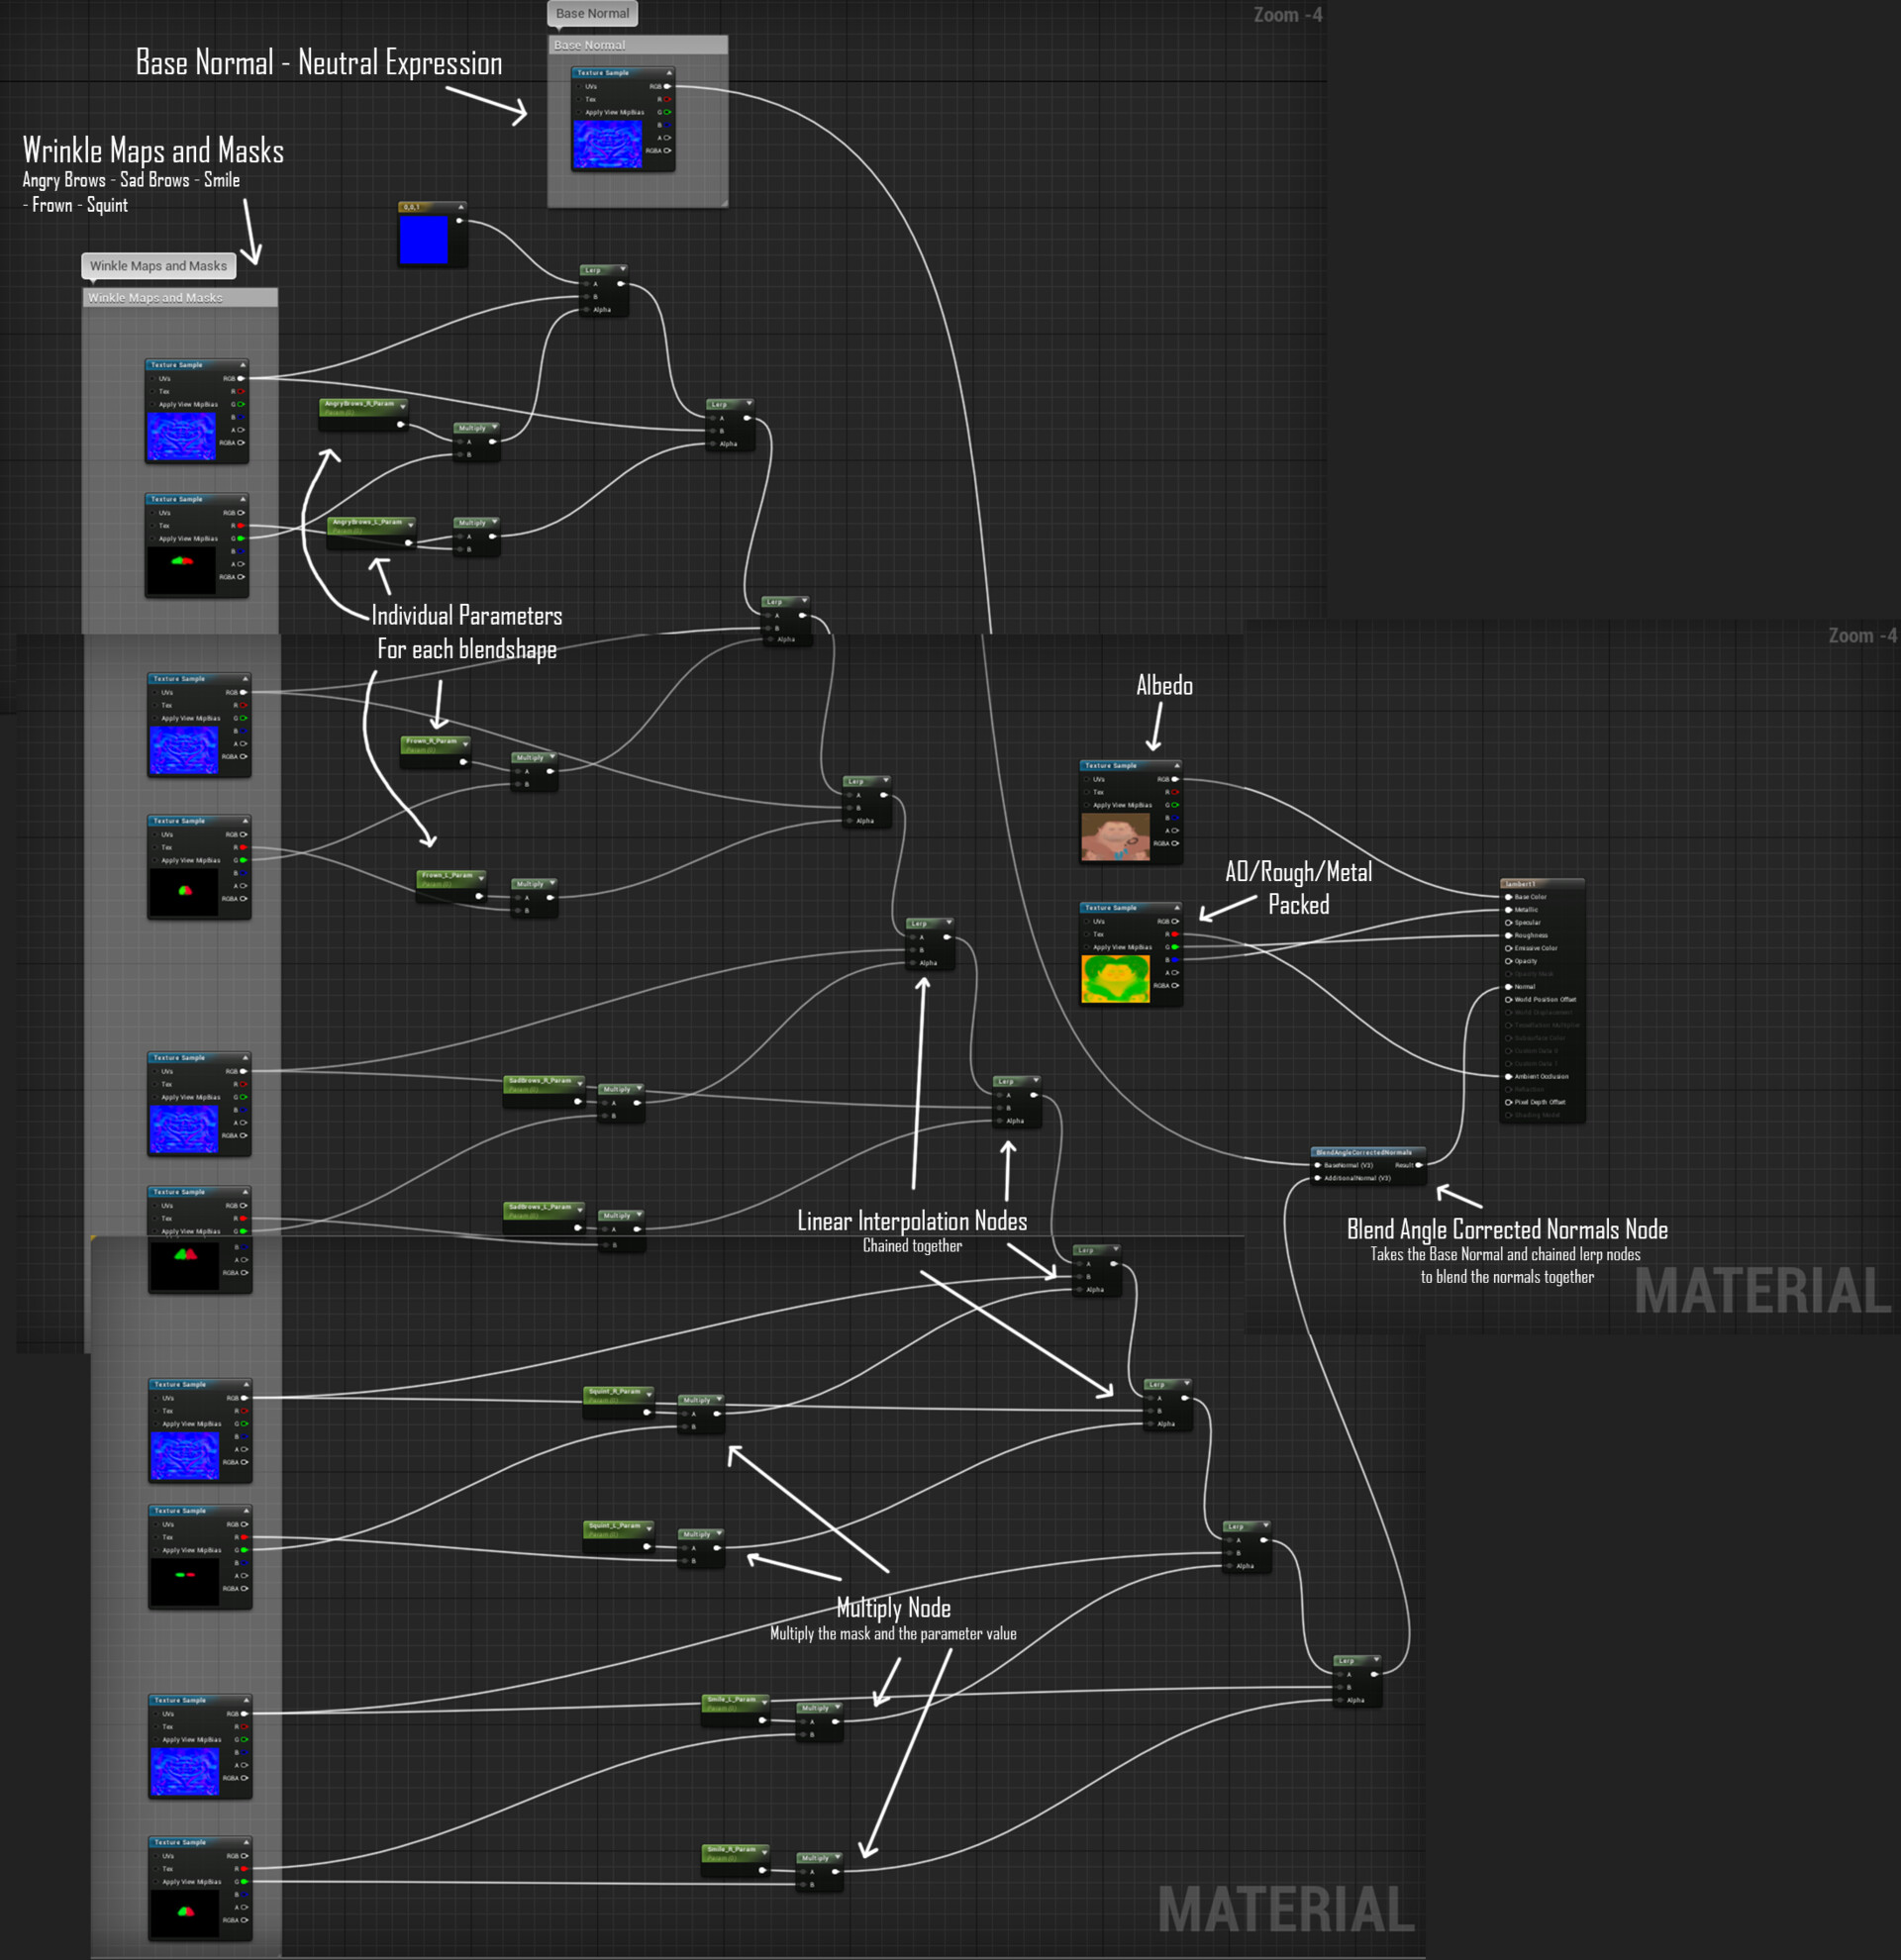
Each wrinkle map is connected to each other using linear interpolation (lerp) nodes. The final lerp node in this chain is fed into a BlendAngleCorrectedNormals node along with the Base Normal (A neutral expression). There are a serious of masks that correspond to blendshapes on the character model and parameters associated with each mask. All of these parameters are set to 0. This means that all of my wrinkle maps and my base normal map are blended together but because all of the masks are set to 0, only the base normal will be visible. 

In the Blueprint:

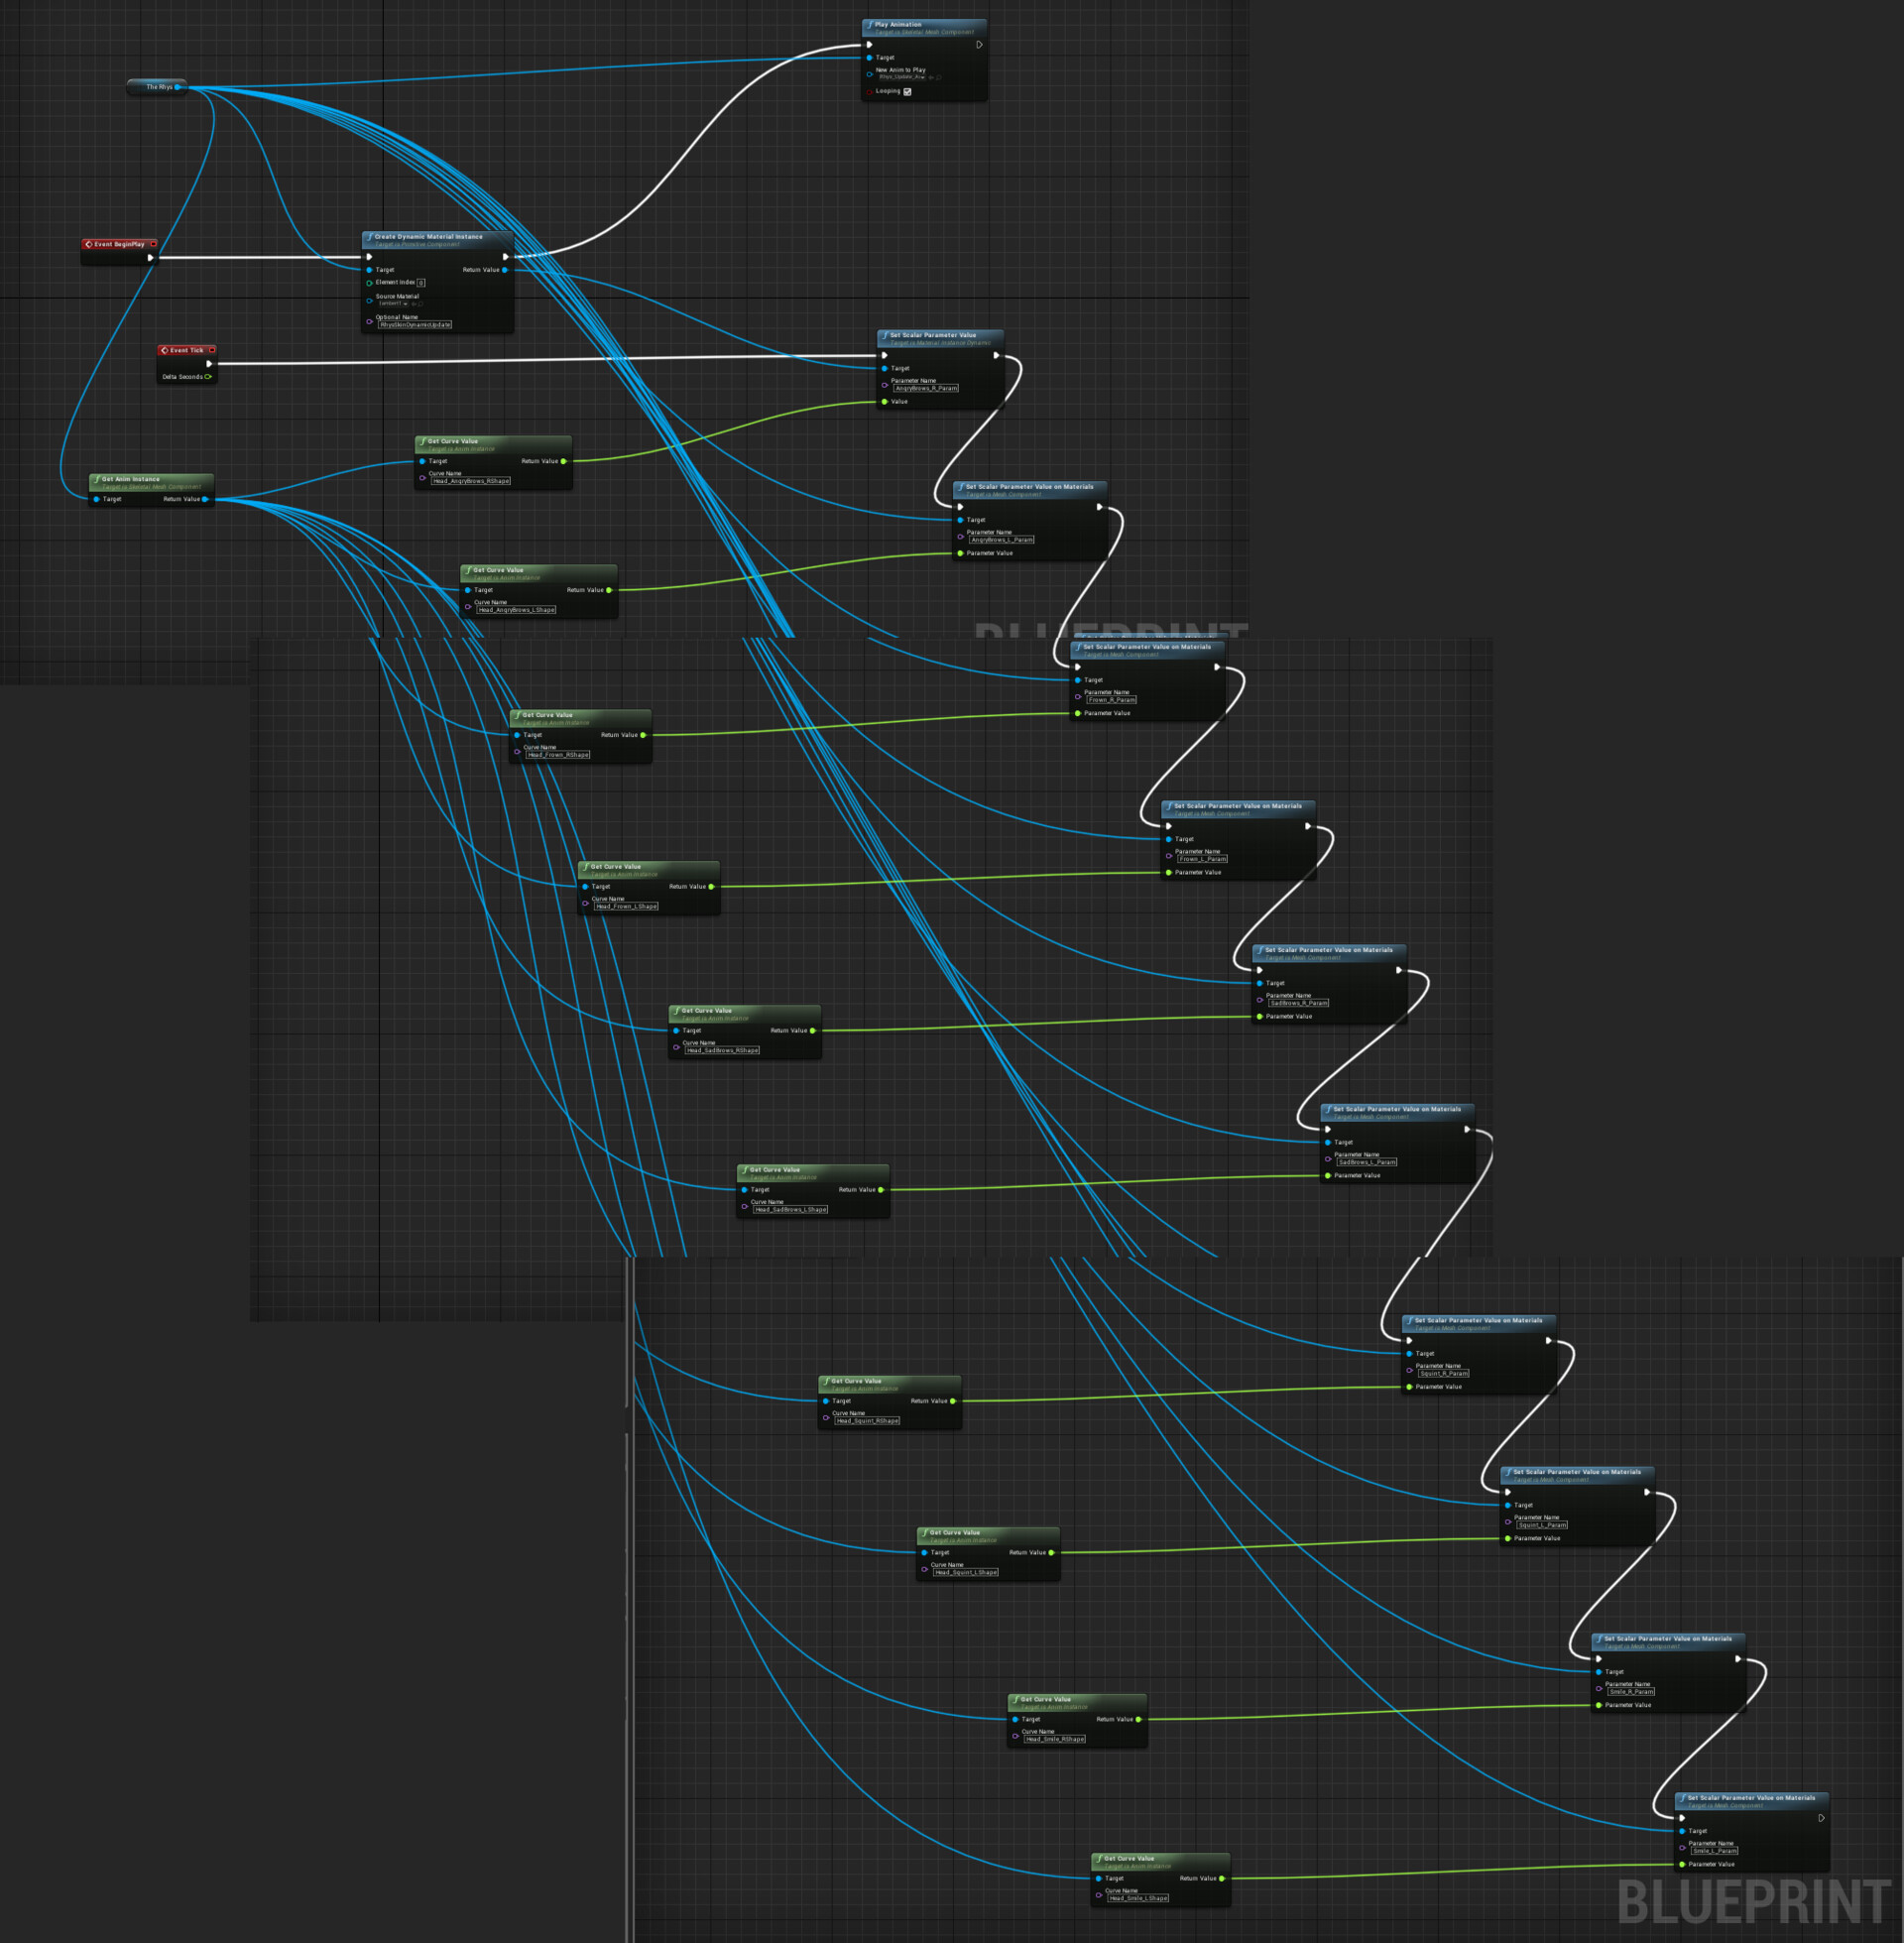
I get the material for the skin and create a Dynamic Material  Instance of it. This means I can change the parameter values within this material at runtime. I get the animation that is playing (In this case it's just a simple loop of the character changing expressions). There are curves in this animation that are controlled by the blendshapes on the character's face. I get the value of each blendshape curve. I then use this value to set the value of the corresponding mask within the material. This means that the mask becomes as opaque as the value of the curve and thus, the wrinkle map comes through this mask!

The basic starting point is to set up the material. For Rhy's model I had 4 material elements, 1 for skin, 1 for hair, 1 for clothes and 1 for eye shine. The one for skin is the one we care about for these wrinkle maps.

I pulled in my textures from Substance Painter and connected everything together for each material then I came back to the skin material. This is the material that will contain all of the wrinkle maps. 

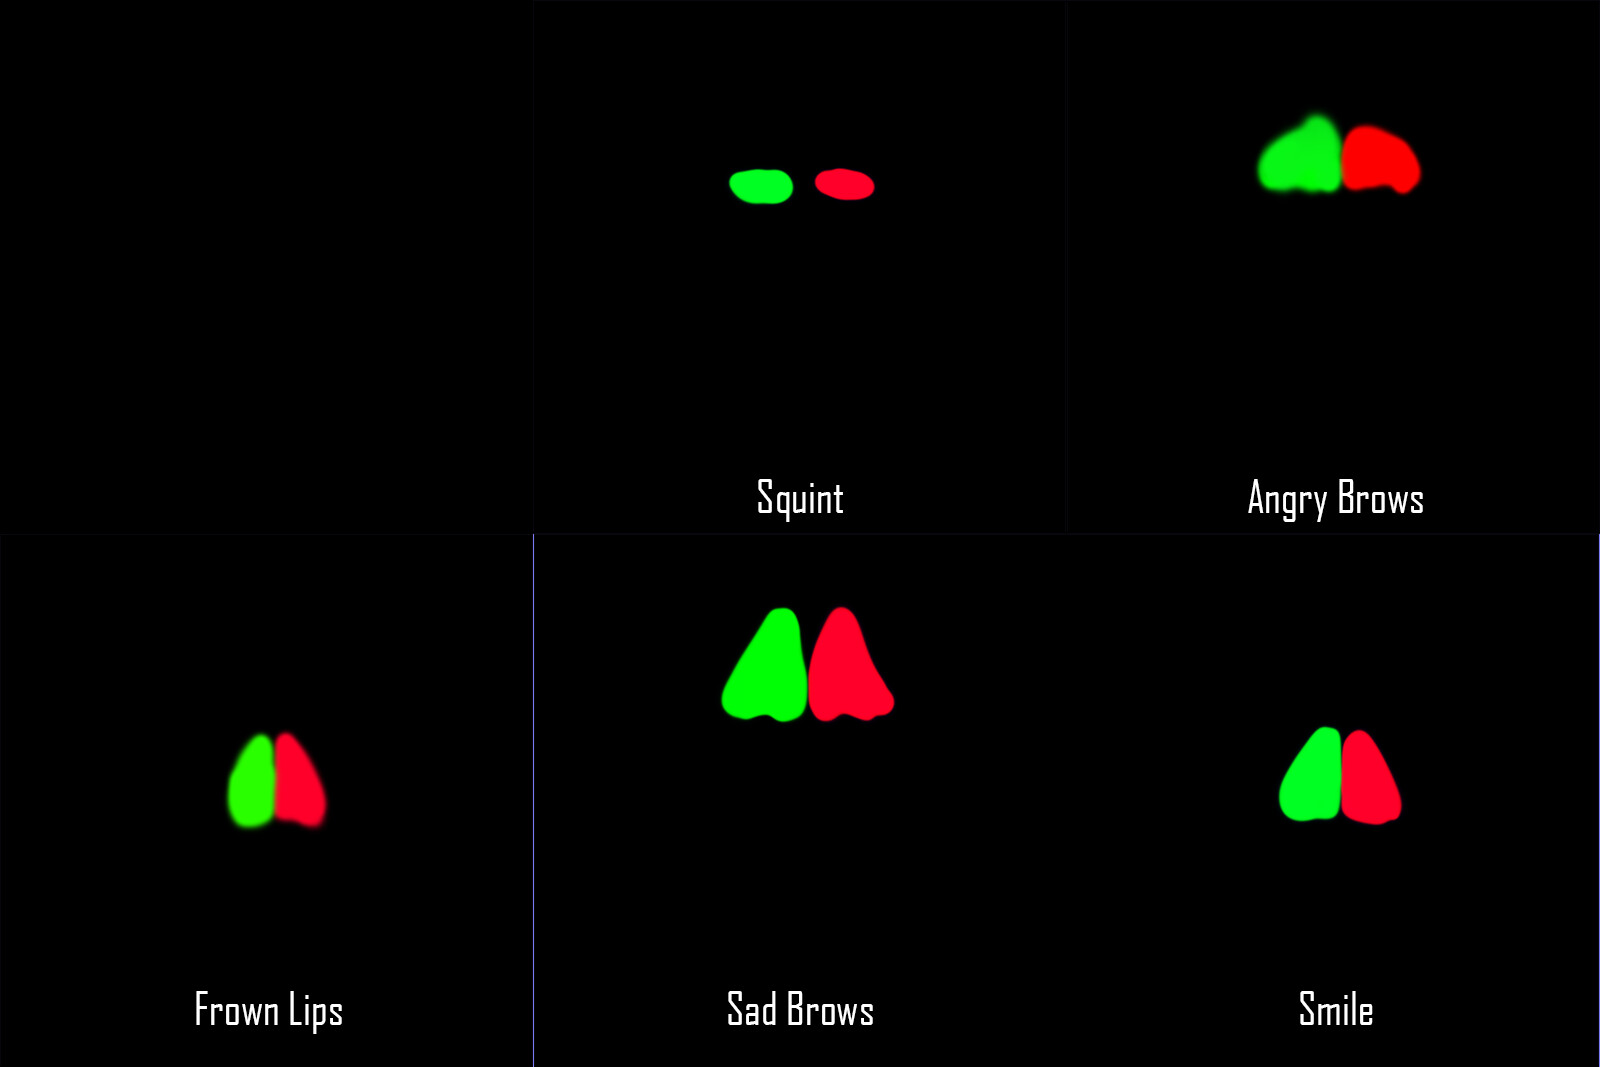
My wrinkle maps had been baked out individually from Marmoset Toolbag 3 and were all set up for UE4. In total I had 6 normal maps:

But these normals effected both sides of the face. i.e. The Angry Brows normal map covered the whole brow area but I had blendshapes that would only effect the left or right side. So I had to create a series of masks to mask between left and right. I created 1 mask texture for each wrinkle map painting the left side red and the right side green for the areas I wanted to effect. 

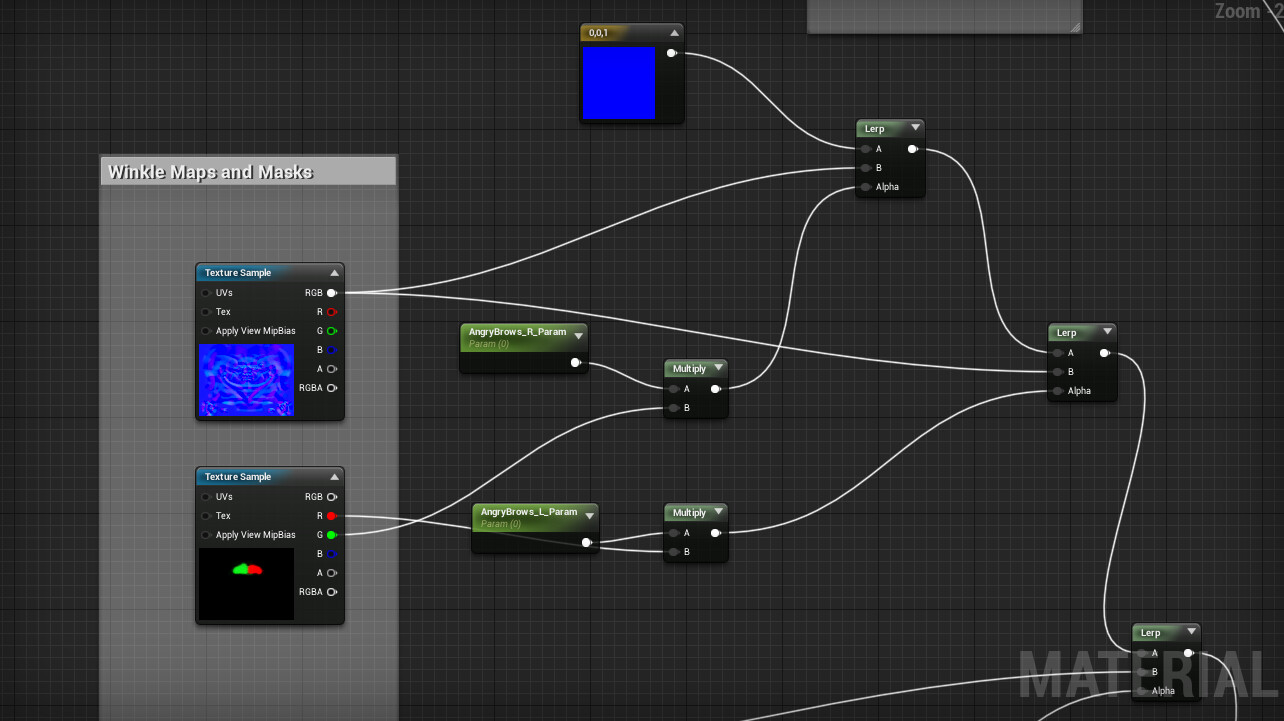
Then I set up the wrinkle maps and masks in the skin material in UE4. I started with my base normal initially unconnected. Then I pulled in each of the wrinkle maps and their corresponding masks. The first wrinkle map is connected to a linear interpolation node along with a pure blue Vector 3 node. Then I need to get the alpha from the masks.

But I also want a parameter associated with this mask so that I can control how visible it is. To do this, I right click in the material editor and type in ScalarParameter. Then I name this node correctly. i.e. AngryBrows_R_Param will be the parameter associated with the right side of the AngryBrows wrinkle map. This parameter is set to 0. 

So for the alpha I take this new scalar parameter and either the red or green channel from the masks (depending on what side I am working on, right or left. I only drag off the red channel for left and for right, I drag off the green channel.) and connect both of these into a Multiply node. Then I connect the multiply node into the lerp node containing the normal of the wrinkle map. 

This is how I set up each wrinkle map and mask. I then take each lerp node and chain them all together. Then I take this final lerp node and connect it to a Blend Angle Corrected Normals Node with my base normal in the BaseNormal slot. In the end, my material looks like this. I've tried to patch everything together so you can see it.

I tried to organise this to make it easy to read, but let me know if it doesn't make sense! I also have my parameters all ready to be accessed in the Blueprint: 

OK, so for me the material was the hard part! Now it's time for the blueprint that drives all of this!

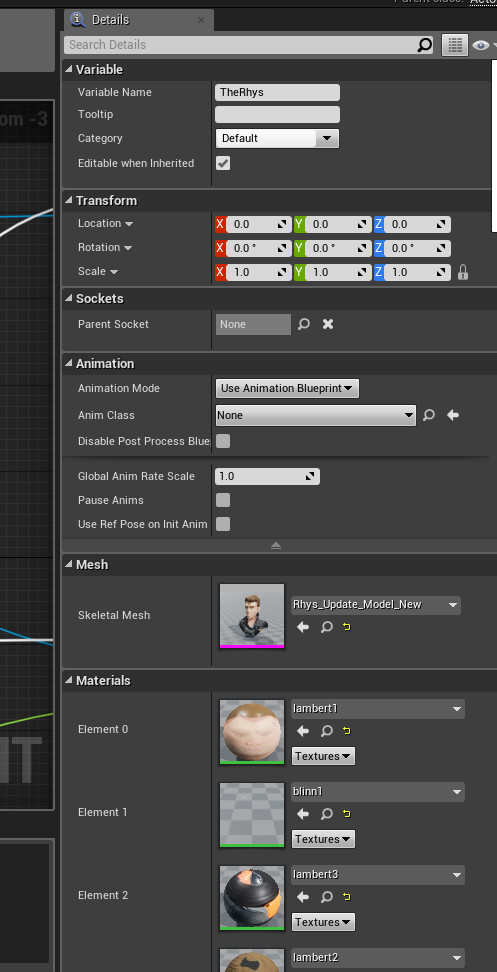
I create a new actor blueprint and navigate to the Event Graph tab. Then I need to get a reference to my character. I do this by adding a component of a Skeletal Mesh

Then on the right hand side I can set the skeletal mesh to be my character model. 

From here I can drag this component into the editor and access it that way, 

So with the skeletal mesh in the editor I Create a Dynamic Material Instance and set the source material to the skin material (In this case lambert1). I set the exec of this to happen on Event BeginPlay (When we play the game) and the target to be my skeletal mesh. Also from this Create Dynamic Material Instance I drag off the exec so that I can start playing the animation. 

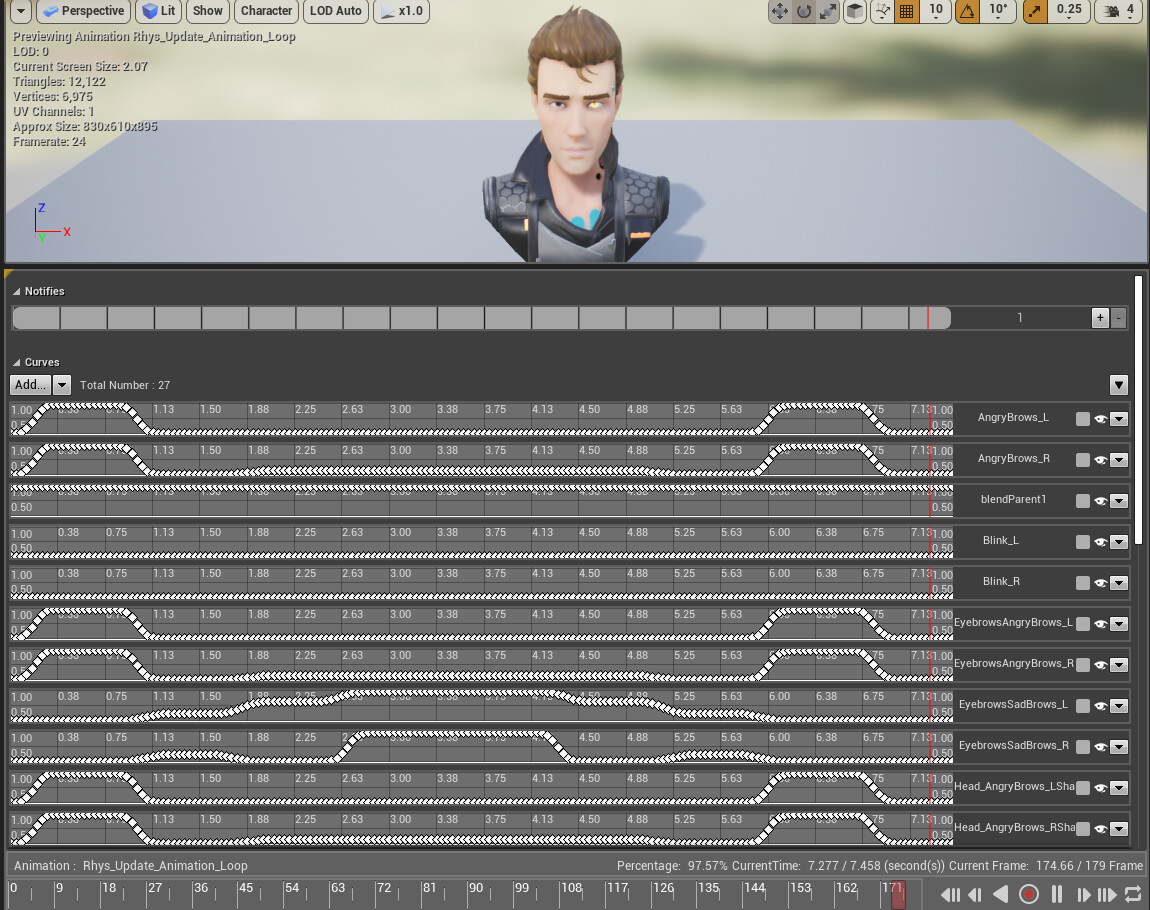
Now I want to access my blendshape curves so that I can get their value for updating my parameters within the skin material. To do this I drag off from the skeletal mesh node and use Get Anim Instance. Then using this node I can get the curve values for every curve in the animation, but obviously, I will only need the curves that drive the blendshapes that effect the wrinkle maps. 

Opening up my animation I can see the curves and I need to make sure that I get the correct name of the curve I'm going to access in the Blueprint

And to get the curve value I just need to type in the correct name of the curve. So to get the AngryBrows on the right hand side value I need this setup:

Now the next bit is to get the wrinkle maps updating. I want this to happen every frame and in UE4 this is called a tick. I use Event Tick to kick everything off. I take the exec from Event Tick and plug it into a Set Scalar Parameter Value Node. Then I take the return value from the Get Curve Value I plug that into the same Set Scalar Parameter Value node where the parameter name matches the parameters from the material that I set up earlier. 

Then I follow the same process for every parameter that I set in the material and chain each Set Scalar Parameter Value node together until I get my final blue print looking something like this;

And then I just drag my Blueprint into a scene and hit play! 

There are probably ways that this could be further optimised, but I'm still new to UE4 so not sure where to tidy things up just yet. I could definitely have merged my normal maps to try and cut down on the number of textures I was pulling into the engine. 

This took a lot of trial and error for me as I am a complete UE4 beginner so I want to link some of the resources I used to eventually build up my working project.

Getting Started with Character Morph Targets Live Training Unreal Engine

Facial Wrinkle Map Blueprints in Unreal Engine 4

Dynamically changing facial normal maps in Unreal Engine 4